Have you ever wondered how to cut metal roofing to fit valleys, ensuring a proper seal and installation?
In this article, we will cover everything you need to know, from the tools required to the best techniques and safety precautions. Let’s dive in!
Tools you’ll need to cut metal roofing for valleys
When cutting metal roofing for valleys, you’ll need a few specific tools to ensure accurate and clean cuts. Here are the essential tools you’ll need:
- Safety equipment: Always prioritize safety when working with metal. Wear protective gloves, safety glasses, and appropriate work attire to protect yourself from sharp edges and metal shards.
- Measuring tape: Use a measuring tape to determine the length and angles for your cuts accurately. Measure the dimensions of the valley and transfer them to the metal roofing sheets.
- Chalk or marker: Mark the cutting lines on the metal sheets using chalk or a marker. This step helps you stay on track and make precise cuts.
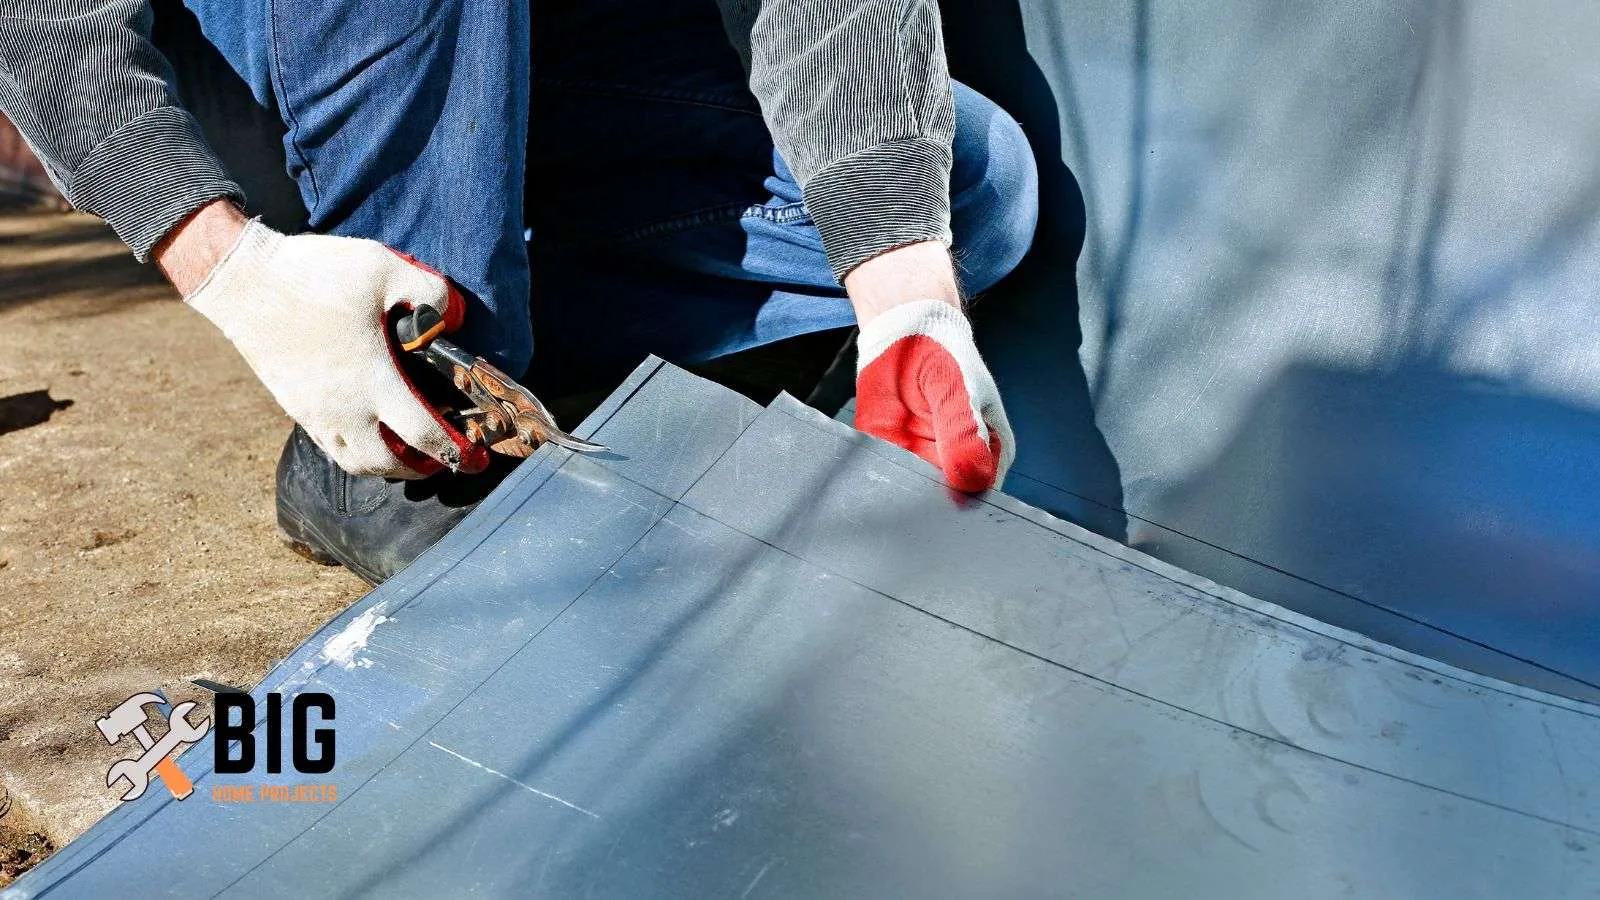
- Tin snips: Tin snips are essential for cutting metal roofing. They come in different types, including straight-cut, left-cut, and right-cut snips. Choose the appropriate snips based on the direction and angle of the cuts you need to make.
- Aviation snips: Aviation snips are also handy for cutting metal roofing. They have a longer handle and a compound leverage mechanism, which makes them more efficient for cutting thicker metal sheets.
- Metal nibbler: A metal nibbler is a specialized tool designed to make clean, precise cuts in sheet metal. It works by punching a series of small holes along the cutting line and then nibbling away the excess metal between the holes. This tool is particularly useful for intricate or curved cuts.
- Angle grinder: An angle grinder with a metal-cutting blade can be used to cut metal roofing sheets. It is a versatile tool that can make straight cuts or trim off any excess metal. Ensure you use appropriate safety measures and wear protective gear when using an angle grinder.
- Circular saw with metal-cutting blade: If you have access to a circular saw with a metal-cutting blade, it can be used to make straight cuts on metal roofing sheets. However, this method produces more sparks and requires caution.
How to cut metal roofing for valleys
Here is the proper sequence of steps for cutting metal roofing for valleys:
Step 1: Measure and mark the metal for cutting
Begin by measuring the dimensions of the valley on the metal roofing sheets. Use a measuring tape and mark the cutting lines with chalk or a marker. Ensure accuracy in your measurements.
Step 2: Cut the panels
Once you have marked the cutting lines, use tin snips or shears to cut the metal roofing sheets along the marked lines. Take your time to make clean and precise cuts.
Step 3: Fit your valley
Position the cut metal panels in the valley area to ensure they fit properly. Make any necessary adjustments to ensure a snug fit and proper alignment with the valley.
Step 4: Angle marking and cutting
If there are any angled cuts required for the valley, use a protractor or angle finder to determine the precise angles. Mark these angles on the metal panels and cut them accordingly using tin snips or shears.
Step 5: Use a circular saw or a nibbler
If you need to make long, straight cuts or have thicker metal sheets, you can use a circular saw with a metal-cutting blade or a metal nibbler. Follow the manufacturer’s instructions for the tool you choose and take the necessary safety precautions.
Step 6: Install an offset cleat
Before securing the metal panels in the valley, install an offset cleat. The cleat will provide additional support and ensure a proper slope for water drainage. Follow the manufacturer’s instructions for installing the offset cleat.
Step 7: Install the edges
Install the metal roofing panels along the edges of the valley, overlapping each panel according to the manufacturer’s recommendations. Utilize the proper fasteners or clips as the manufacturer has recommended to secure the panels in place.
Step 8: Bending the eave clip
If your metal roofing system includes eave clips, bend them to the required shape to ensure a secure fit and proper alignment with the metal panels.
Step 9: Seal the valley
Apply a sealant or flashing tape to the valley area to create a watertight seal. This will help prevent water infiltration and potential leaks.
Step 10: Clean up
Once the metal roofing panels are properly installed and sealed, clean up any metal shavings, debris, or scraps from the work area. Dispose of them safely, and ensure the area is clear.
How do you make sure that metal roofing is cut to the proper size?
- Measure the valley accurately: Use a measuring tape to measure the length and width of the valley where the metal roofing will be installed. Take precise measurements and double-check them to avoid errors.
- Mark the cutting lines: Transfer the measurements to the metal roofing sheets by marking the cutting lines with chalk or a marker. Clearly mark the lines to ensure accuracy during the cutting process.
- Consider the angle: If the valley has an angled or sloping design, use a protractor or angle finder to determine the precise angles. Mark these angles on the metal panels to guide your cuts.
- Cut the panels: Use tin snips or shears to cut the metal roofing sheets along the marked cutting lines. Take your time and make clean, straight cuts to ensure a proper fit in the valley.
- Test the fit: Position the cut metal panels in the valley and check if they fit properly. Make any necessary adjustments to ensure a snug fit and proper alignment with the valley.
- Fine-tune the cuts: If the fit is not ideal, make small adjustments by trimming the edges of the metal panels with tin snips or shears. Be careful not to remove too much material at once, as it can affect the overall fit and integrity of the roofing.
- Check for gaps or overlaps: Ensure that there are no gaps or overlaps between the metal roofing panels in the valley. Proper alignment and a seamless connection are crucial for preventing water leaks.
- Secure the panels: Once the metal panels fit properly in the valley, secure them in place according to the manufacturer’s instructions. Use appropriate fasteners or clips to ensure a secure and durable installation.
What is the best tool for cutting metal roofing?
- Tin snips/aviation snips: Tin snips are widely used and effective for cutting thinner gauge metal roofing sheets. They come in different variations, such as straight-cut, left-cut, and right-cut snips, to accommodate various cutting directions. Aviation snips are similar but designed for thicker materials and offer better leverage and cutting power.
- Metal nibbler: A metal nibbler is a specialized tool designed for cutting sheet metal. It creates clean, precise cuts by punching small holes along the cutting line and then removing excess material. Metal nibblers are ideal for intricate or curved cuts and work well on various thicknesses of metal roofing.
- Circular saw with metal-cutting blade: A circular saw equipped with a metal-cutting blade is an excellent option for making straight cuts on metal roofing. It provides fast, efficient cutting and is suitable for thicker gauge metal. Ensure you use appropriate safety measures and securely clamp the metal roofing during cutting.
- Angle grinder with metal-cutting disc: An angle grinder is a versatile tool that can be used with a metal-cutting disc to make straight cuts on metal roofing. It is particularly useful for thicker metal sheets but requires caution due to sparks and the potential for rougher cuts compared to other tools.
- Electric shears: Electric shears are motorized tools designed specifically for cutting metal. They can make clean, straight cuts in a variety of metal roofing materials. Electric shears are often faster than manual cutting tools and are suitable for thicker gauges.
- Plasma cutter: For heavy-duty cutting applications and thicker metal roofing, a plasma cutter can be an excellent choice. It uses a high-temperature jet of ionized gas to cut through metal with precision. Plasma cutters are typically used in professional or industrial settings.
How do you ensure a proper seal when cutting metal roofing?
- Use proper flashing: Flashing is an essential component in creating a watertight seal in valleys. Install flashing along the valley area before placing the cut metal roofing panels. Ensure the flashing is designed specifically for valleys and is compatible with the roofing material you are using.
- Apply sealant or adhesive: Before installing the metal roofing panels, apply a high-quality sealant or adhesive to the valley area. This helps create a strong bond between the metal panels and the flashing, preventing water infiltration. Follow the manufacturer’s instructions for the recommended sealant or adhesive for your specific metal roofing system.
- Overlap correctly: When installing the metal roofing panels in the valley, ensure they overlap properly. The amount of overlap will depend on the manufacturer’s recommendations and the slope of the valley. Proper overlapping helps channel water away from the valley and prevents leaks.
- Secure with fasteners: Use appropriate fasteners or clips to secure the metal roofing panels in place. Make sure to follow the manufacturer’s instructions for the recommended fastening method. Fasteners should be positioned in a way that does not compromise the integrity of the seal and maintains the overlapping alignment.
- Apply additional sealant: Once the metal panels are securely fastened, apply an additional layer of sealant along the seams and joints. This further enhances the seal and provides extra protection against water infiltration. Use a sealant that is compatible with your metal roofing material and follow the manufacturer’s guidelines for application.
- Inspect for gaps or leaks: After the installation is complete, carefully inspect the valley area for any gaps or potential leaks. Pay attention to the seams, joints, and overlapping sections. If any gaps or issues are identified, address them promptly by applying additional sealant or making the necessary adjustments.
- Regular maintenance: To ensure the long-term integrity of the seal, perform regular maintenance checks on your metal roofing system. Inspect the valley area periodically for signs of damage, deterioration, or loose fasteners. Replace any damaged sealant or flashing and tighten any loose fasteners as needed.
How wide should the valley be on a metal roof?
The width of the valley on a metal roof can vary depending on factors such as the roof pitch, the anticipated volume of water flow, and local building codes.
As a general guideline, valleys on metal roofs typically range from 24 to 36 inches wide.
However, it’s essential to consult the manufacturer’s specifications and local building regulations to determine the appropriate width for your specific metal roof installation.
Proper valley width ensures adequate water flow, prevents water accumulation, and contributes to the overall performance and longevity of the roofing system.
What are some common mistakes to avoid when cutting metal roofing?
Inaccurate measurements
Failing to take precise measurements or making errors in measuring can result in improperly sized metal roofing panels.
This can lead to gaps, misalignment, and difficulty achieving a watertight seal. Double-check your measurements before cutting to ensure accuracy.
Using incorrect cutting tools
Using improper cutting tools or using them incorrectly can result in jagged or uneven cuts.
Make sure to choose the appropriate cutting tools designed for metal roofing and follow the recommended techniques for clean and accurate cuts.
Rushing the cutting process
Cutting metal roofing requires patience and attention to detail. Rushing can lead to mistakes, uneven cuts, and potential safety hazards.
Take your time, follow a steady pace, and focus on making accurate cuts to achieve the desired results.
Neglecting safety precautions
Metal roofing cutting involves sharp tools and potentially hazardous situations.
Neglecting safety precautions such as wearing appropriate protective gear (gloves, safety glasses, etc.) or using proper cutting techniques can lead to injuries. Prioritize safety at all times to avoid accidents.
Overlooking the need for proper support
Metal roofing sheets, especially larger ones, require proper support during cutting to prevent bending or distortion.
Ensure the material is adequately supported on a stable surface, or use clamps and sawhorses to maintain stability while cutting.
Not cleaning up sharp edges
After cutting the metal roofing panels, sharp edges and burrs may remain. Neglecting to clean up these edges can result in injuries during installation or later maintenance.
Use a file or deburring tool to smooth out the edges for a safer and more professional finish.
Incorrect installation of the cut panels
Even with accurate cuts, improper installation can lead to gaps, leaks, or structural issues.
Follow the manufacturer’s instructions and recommended installation techniques to ensure the cut panels are properly fitted, overlapped, and securely fastened.
What is the life expectancy of metal roofing cuts on valleys?
The life expectancy of metal roofing cuts on valleys is generally the same as the overall lifespan of the metal roof itself, which can range from 40 to 70 years or more depending on the specific metal material used and the quality of installation.
Properly executed cuts and installation techniques, along with regular maintenance, can ensure that the valleys maintain their integrity and watertightness throughout the lifespan of the metal roof.
How much does it cost to install metal roofing in valleys?
The cost to install metal roofing in valleys can vary depending on several factors, including the size of the roof, the type and quality of the metal material, the complexity of the valley design, and the location.
On average, metal roofing installation costs can range from $7 to $12 per square foot. Valleys may involve additional labor and materials due to the precision cutting and flashing required.
What are the benefits of installing a metal roof valley?
Installing a metal roof valley offers several benefits. First, metal roofs are highly durable and long-lasting, providing excellent resistance against weather elements such as rain, snow, wind, and UV rays.
Valleys play a crucial role in diverting water away from the roof, preventing pooling and potential leaks.
Metal roofing valleys also enhance the aesthetic appeal of the roof by providing clean lines and a sleek appearance.
Also, metal roofs are energy-efficient, lightweight, environmentally friendly, and require minimal maintenance, making them a cost-effective and sustainable roofing option for valleys.
Other interesting articles: