Dealing with a leaky pipe can be a nightmare for any homeowner, but epoxy putty serves as a versatile and efficient solution to this common issue. This unique substance hardens into a waterproof seal, making it ideal for fixing pipes without having to call in a professional plumber.
In this article, we will explore the ten essential steps needed to fix a leaky pipe using epoxy putty like a pro.
Table of contents
10 essential steps to fixing a leaky pipe with epoxy putty like a pro
Step 1: Identify the leak
The first step in fixing a leaky pipe with epoxy putty is to identify the precise location of the leak. Look for any signs of water dripping or moisture around the pipe. It is essential to accurately locate the leak to ensure an effective repair.
Step 2: Turn off the water supply
Before attempting any repairs, it is crucial to turn off the water supply to the affected pipe. This will prevent water from flowing and minimize the risk of further damage or flooding.
Step 3: Prepare the pipe
To ensure a successful repair, clean the pipe surface around the leak thoroughly. Use a piece of sandpaper or a wire brush to remove any rust, debris, or loose particles. The epoxy putty adheres better to a clean and rough surface.
Step 4: Cut and knead the epoxy putty
Follow the manufacturer’s instructions to cut an appropriate amount of epoxy putty. Knead it thoroughly until it becomes a uniform color. This process ensures that the two components of the putty combine effectively for optimal bonding.
Step 5: Apply the epoxy putty
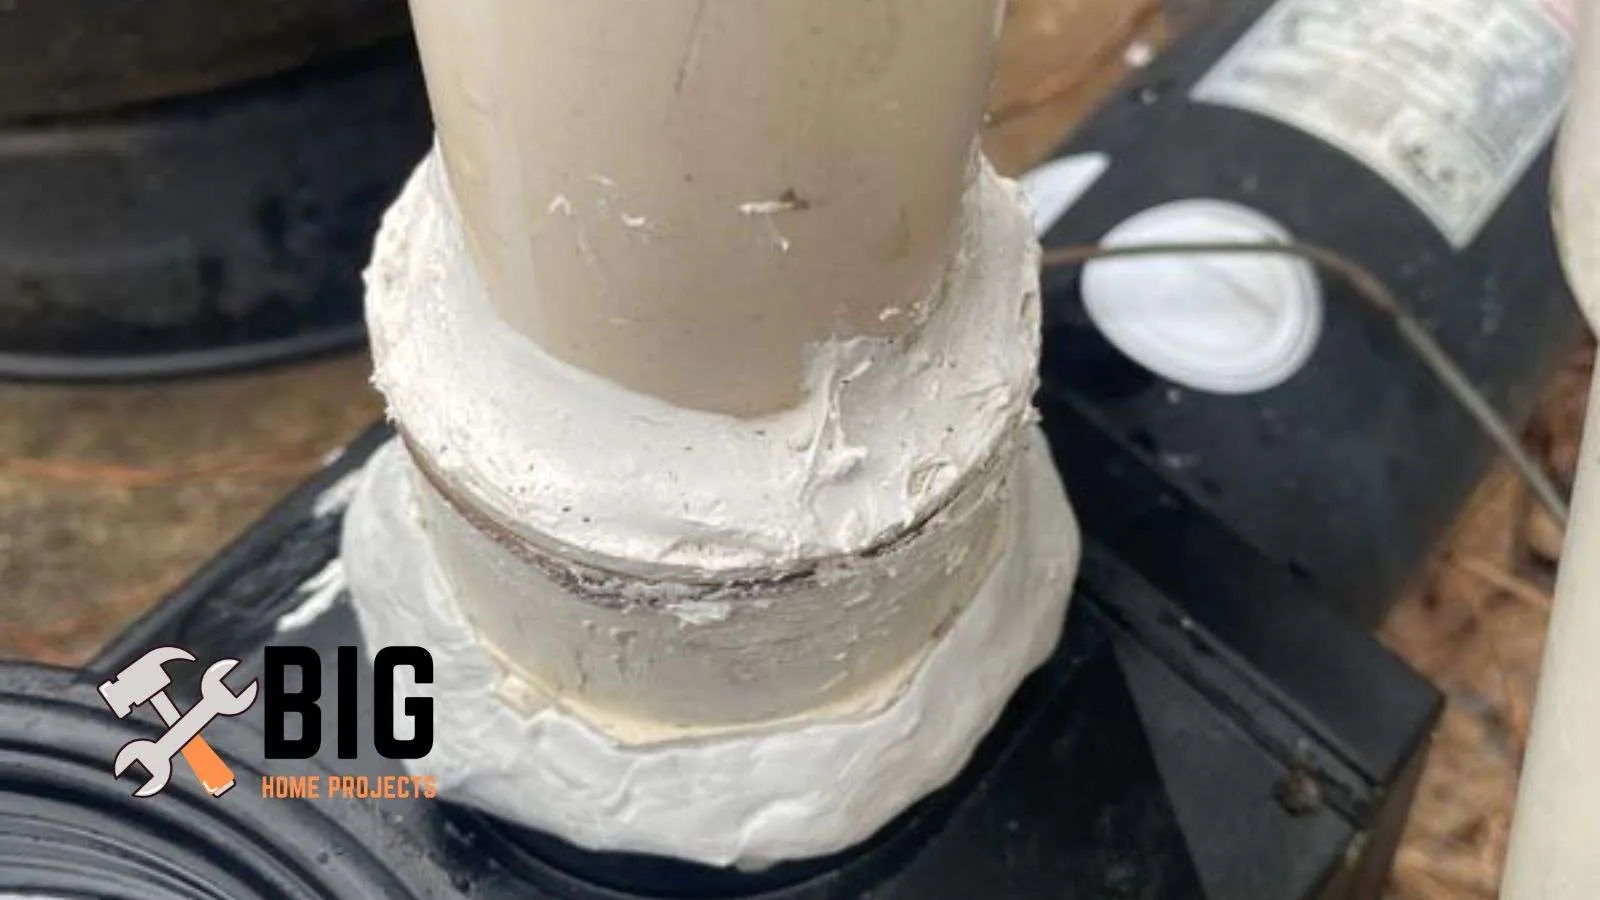
Take the kneaded epoxy putty and press it onto the leak area. Apply a generous amount and make sure to cover the entire leak. Use your fingers to mold the putty and create a tight seal around the pipe. Ensure the putty extends beyond the leak for added strength.
Step 6: Smooth and shape the putty
Once the epoxy putty is applied, use a damp cloth or wet fingers to smooth and shape it. This step helps to create a neat and even surface, making it easier to paint or camouflage the repaired area later if desired.
Step 7: Allow the putty to cure
Follow the recommended curing time provided by the manufacturer. It is essential to allow the epoxy putty to fully cure before turning the water supply back on. This will ensure a strong and durable repair.
Step 8: Test for leaks
After the recommended curing time has passed, turn the water supply back on and carefully inspect the repaired area for any signs of leakage. Test the repair by running water through the pipe and monitoring for any drips or moisture.
Step 9: Paint or waterproof (Optional)
If you wish to conceal the repaired area, you can paint over the epoxy putty using an appropriate paint for the pipe material. Alternatively, you can apply a waterproof sealant to enhance the longevity of the repair.
Step 10: Monitor the repair
Keep an eye on the repaired area for several days to ensure that the leak is permanently fixed. If you notice any recurring leaks or further issues, it may be necessary to seek professional help.
Why use epoxy putty for pipe leaks?
Epoxy putty is an excellent choice for fixing pipe leaks due to its durability and versatility.
It is specifically designed to create a strong bond and provide a reliable seal, making it ideal for repairing leaks in various types of pipes.
Epoxy putty is resistant to water, chemicals, and high temperatures, ensuring that the repaired area remains secure and leak-free over time.
It can be easily molded and shaped to conform to the shape of the pipe, allowing for a customized and effective repair.
When should you choose epoxy putty over other methods?
- Quick and temporary fixes: Epoxy putty is an excellent choice for quick and temporary fixes, especially in emergency situations. It can provide an immediate solution to stop leaks temporarily until a more permanent repair can be performed.
- Small leaks: Epoxy putty is particularly effective for small leaks or cracks in pipes. It can create a tight seal and prevent further water damage, even in hard-to-reach areas.
- Versatility: Epoxy putty is compatible with various types of pipes, including metal, PVC, and copper. This versatility makes it a convenient option when dealing with different pipe materials.
- Adherence to wet surfaces: Unlike some other methods, epoxy putty can adhere to wet surfaces. This feature is beneficial when dealing with leaking pipes where it may not be possible to fully dry the area before applying the repair.
- Durability: Epoxy putty forms a strong bond that is resistant to water, chemicals, and high temperatures. It provides a durable and long-lasting repair, ensuring that the fixed pipe remains leak-free for an extended period.
Tools for fixing a leaky pipe with epoxy putty
- Safety gloves: It is essential to protect your hands with safety gloves while working with epoxy putty and handling potentially sharp or rough surfaces.
- Sandpaper or wire brush: Use sandpaper or a wire brush to clean and roughen the surface of the pipe around the leak. This step ensures better adhesion of the epoxy putty.
- Epoxy putty: Purchase a reputable epoxy putty product from a hardware store or online. Follow the manufacturer’s instructions for cutting and kneading the putty.
- Damp cloth: Use a damp cloth to clean the pipe surface before applying the epoxy putty. This helps remove any loose debris or dirt.
- Paint or waterproof sealant (Optional): If you plan to paint or waterproof the repaired area, you will need appropriate paint or sealant for your pipe material.
How to prepare a leaky pipe for epoxy putty?
- Turn off the water supply: Before starting any repairs, turn off the water supply to the affected pipe. This will prevent water from flowing and minimize the risk of further leakage or damage.
- Identify the leak: Locate the precise area of the leak. Look for any signs of water dripping or moisture around the pipe. This step ensures that you focus your repair efforts on the correct spot.
- Clean the pipe surface: Use a piece of sandpaper or a wire brush to clean the pipe surface around the leak. Remove any rust, debris, or loose particles. This step helps create a clean and rough surface, which enhances the effectiveness of the epoxy putty.
- Dry the area (if possible): If the pipe is accessible and the leak is not severe, try to dry the area using a cloth or towel. Removing excess moisture will improve the adhesion of the epoxy putty.
- Wear safety gloves: Put on safety gloves to protect your hands while working with the pipe and epoxy putty.
What to expect during the curing process of epoxy putty
- Hardening: As the epoxy putty cures, it will harden and become solid. The putty changes from a pliable state to a rigid one, providing a strong and durable repair.
- Color change: Depending on the brand and type of epoxy putty used, you may notice a color change during the curing process. The putty may transition from a soft or malleable color to a more solid or cured color.
- Time frame: The curing time can vary depending on the specific epoxy putty product. Follow the manufacturer’s instructions for the recommended curing period. Typically, it can range from a few hours to several days. Avoid disturbing or putting pressure on the repaired area during this time.
- Setting and bonding: Epoxy putty will bond with the pipe surface and create a strong seal during the curing process. It forms a tight connection that helps prevent leaks and withstands water pressure.
- Temperature and environmental factors: Both can have an impact on the curing process. Warmer temperatures generally accelerate the curing time, while colder temperatures may slow it down. Take into account the manufacturer’s recommended temperature range.
- Full cure: Allow the epoxy putty to fully cure before turning the water supply back on or putting any stress on the repaired area. This ensures that the repair is complete and provides maximum strength and effectiveness.
How to test if the leaky pipe is effectively sealed
- Turn on the water supply: Once the recommended curing time has elapsed, turn on the water supply to the repaired pipe. Gradually increase the water flow to its normal level.
- Inspect for leaks: Carefully examine the repaired area for any signs of leakage. Look for drips, moisture, or any water seeping through the previously leaky section. Pay close attention to the edges of the epoxy putty and the surrounding pipe.
- Monitor the repair: Keep an eye on the repaired area for a period of time, preferably several hours or even a day. Observe if any water continues to leak or if the repair holds well without any signs of moisture.
- Repeat the test: If no leaks are detected initially, run water through the pipe for an extended period to ensure the repair withstands normal usage. Check again for any signs of leakage.
Is epoxy putty a permanent solution for leaky pipes?
Epoxy putty is generally considered a long-lasting solution for fixing leaky pipes, but it may not be considered a permanent fix in all cases.
At the beginning, epoxy putty can provide a durable and effective seal, preventing further leaks and water damage.
However, factors such as the severity of the damage, pipe material, and environmental conditions can influence the longevity of the repair.
It is always recommended to monitor the repaired area over time and seek professional assistance if the leak persists or worsens.
In some cases, a permanent solution may involve replacing the damaged section of the pipe or implementing more extensive repairs.
How to identify the source of the leak
- Inspect visible pipes: Start by visually examining the visible pipes in the area where the leak is occurring. Look for any signs of moisture, water droplets, or discoloration on the pipes. Pay attention to joints, connections, and any visible cracks or damage.
- Trace water stains: Water stains on walls, ceilings, or floors can often indicate the general area of the leak. Follow the direction of the stains to locate the source. Keep in mind that water can travel along pipes or structural elements, so the actual source may be slightly away from the visible stain.
- Check connections: Examine the connections between pipes, such as joints, valves, faucets, or fixtures. These areas are common culprits for leaks. Look for any signs of dripping, moisture, or loose fittings.
- Listen for sounds: Listen for any sounds of dripping or hissing, which can help pinpoint the location of the leak. Turn off any appliances or devices that may create background noise to enhance your ability to hear potential leaks.
- Feel for moisture: Run your hand along the pipes, feeling for any dampness or moisture. Be cautious, as some pipes may be hot or sharp. Moisture can indicate the proximity of the leak source.
- Use leak detection tools: If the leak is difficult to locate visually, you can utilize specialized leak detection tools such as a moisture meter or thermal imaging camera. These tools can help identify hidden leaks behind walls or within structures.
Maintaining your pipes post-epoxy-application
After applying epoxy putty to fix a leak in your pipes, it is important to take proper care and maintenance to ensure the longevity of the repair. Here are some tips for maintaining your pipes post-epoxy application:
- Regular inspections: Periodically inspect the repaired area and surrounding pipes for any signs of new leaks or damage. Look for drips, moisture, discoloration, or unusual odors. Early detection can help prevent further issues.
- Monitor water pressure: Keep an eye on the water pressure in your plumbing system. If you notice a sudden decrease in water pressure or irregularities, it may indicate a problem with the repaired area. Contact a professional plumber for further evaluation.
- Avoid chemicals: Avoid using harsh chemicals or drain cleaners that can potentially damage the epoxy putty or weaken the bond. Opt for more gentle and environmentally friendly alternatives for cleaning your pipes.
- Prevent freezing: If you live in an area prone to freezing temperatures, take steps to prevent pipe freezing. Insulate exposed pipes, especially those in unheated areas, to minimize the risk of pipe damage or leaks.
- Address plumbing issues promptly: Attend to any plumbing issues promptly to prevent further stress on the repaired area. Fix any dripping faucets, running toilets, or other plumbing problems that can potentially strain the pipes and compromise the repair.
- Professional inspection: Consider scheduling regular professional inspections of your plumbing system. An experienced plumber can assess the condition of your pipes, identify potential issues, and provide necessary maintenance or repairs.
More interesting posts
- How to Fix a Leaky Pipe with Self-Fusing Silicone: 5 Easy Steps
- How to Fix a Leaky Pipe with Plumbers Tape: 8 Easy Steps
- 7 Ways to Fix Leaking Pipes Without Replacing Them
- Why Plumbers Love Sharkbites: 10 Reasons Plumbers Love SharkBite Fittings

Author: Logan
I help people connect with businesses
