The integrity of a roofing system is heavily reliant on proper water shield placement to prevent water infiltration and damage. A water shield is a critical barrier that protects vulnerable areas where water can penetrate or accumulate.
In this article, we dive into 11 essential strategies to get the right water shield placement on roofs.
The Importance of Water Shield Placement in Roofing
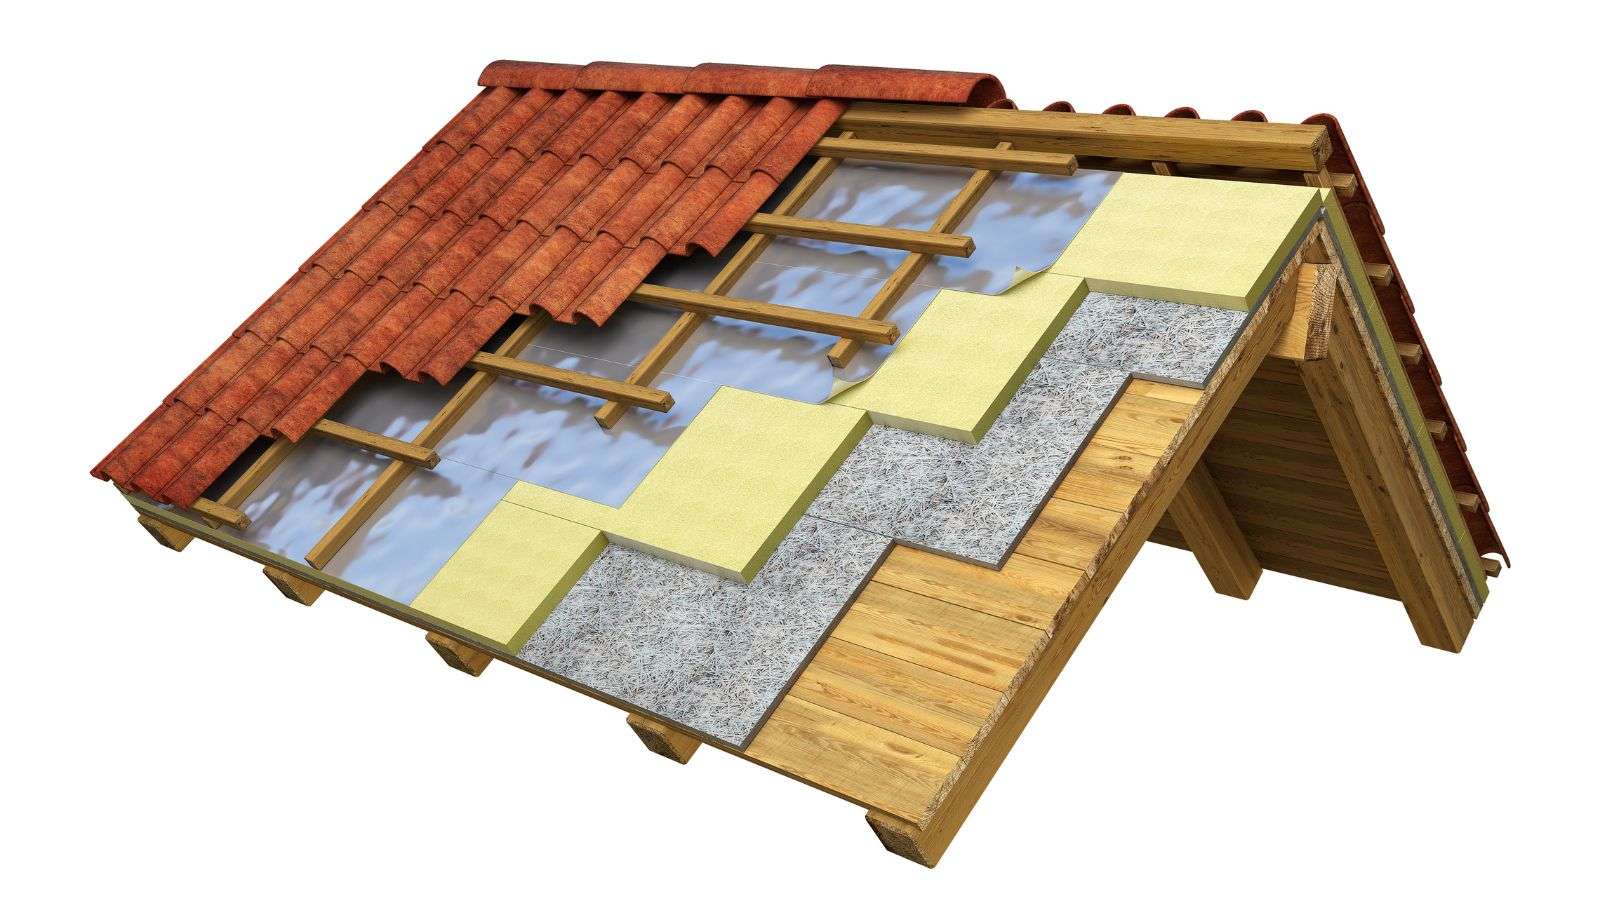
Water shield placement in roofing is essential for ensuring the longevity and effectiveness of the roof system. Placing the water shield, such as an ice and water shield or synthetic underlayment, in the right locations can prevent water infiltration and damage to the underlying structure. Proper placement involves installing the water shield along eaves, valleys, penetrations, and other vulnerable areas where leaks are more likely to occur.
For example, at the eaves, the water shield should extend past the interior wall line to protect against ice dams and wind-driven rain. In valleys, the water shield should be installed in a shingling fashion to direct water away from seams. Around roof penetrations like chimneys or vents, the water shield should be carefully integrated to create a watertight seal.
Neglecting the correct placement of the water shield can result in costly repairs due to water damage and compromised structural integrity. Therefore, attention to detail and precision in water shield placement play a pivotal role in maintaining a watertight and durable roofing system.
11 Essential Strategies for Water Shield Placement
1. Properly Overlap Water Shield Seams
Overlap water shield seams by the manufacturer’s recommended amount to maintain a continuous barrier against water infiltration. Proper overlapping prevents water from seeping through the joints and causing leaks in the roof system.
2. Extend the water shield beyond eaves and Rakes
Extend the water shield beyond eaves and rakes to provide extra protection against ice dams and wind-driven rain. This extended coverage helps safeguard the vulnerable edges of the roof, where water tends to accumulate and penetrate.
3. Secure a water shield around roof penetrations.
Secure the water shield meticulously around roof penetrations such as chimneys, vents, and skylights to create a watertight seal. Properly integrating the water shield around these areas prevents water from seeping into the roof through gaps or unsealed edges.
4. Install Water Shield in Valleys
Install the water shield in valleys in a shingling fashion to guide water away from seams and vulnerable areas. This technique directs water flow effectively, reducing the risk of leaks and water damage in these critical areas where two roof planes meet.
5. Protect Against Lateral Water Movement
Make sure the placement of the water shield accounts for lateral water movement, especially in areas prone to heavy rainfall or snow accumulation. Considering potential water flow patterns can help enhance the effectiveness of the water shield in diverting water away from vulnerable spots on the roof.
6. Use High-Quality Water Shield Materials
Opt for high-quality water shield materials that offer superior durability and long-lasting protection against moisture intrusion. Investing in premium materials ensures the effectiveness of the water shield over time, reducing the likelihood of premature failure or damage.
7. Follow Manufacturer’s Installation Guidelines
Adhere to the manufacturer’s installation guidelines when placing the water shield to guarantee proper application and optimal performance. Following the recommended procedures and techniques makes sure that the water shield functions as intended, providing reliable protection for your roof.
8. Consider Climate-Specific Factors
Take into account climate-specific factors such as temperature fluctuations, humidity levels, and prevailing weather conditions when positioning the water shield. Tailoring the placement to suit your region’s climate can enhance the resilience of the roof system against environmental stressors.
9. Inspect and maintain the water shield regularly.
Regularly inspect and maintain the water shield to identify any signs of wear, damage, or deterioration right away. Timely maintenance makes sure that the water shield remains intact and functional, preserving its effectiveness in preventing water intrusion into the roof structure.
10. Integrate flashing with a water shield.
Integrate flashing components with the water shield to reinforce critical areas prone to leaks, such as roof transitions, dormers, and sidewalls. Proper integration of flashing enhances the waterproofing capabilities of the roof assembly, reducing the risk of water damage in these sensitive zones.
11. Seek Professional Guidance for Complex Installations
Consult with roofing professionals for complex installations or challenging roof configurations that require specialized expertise in water shield placement. Professional guidance can help ensure precision and accuracy in positioning the water shield to maximize its protective benefits for your specific roofing system.
Identifying Common Roof Vulnerabilities to Water Damage
- Improperly Installed Flashing: Improper installation of flashing around roof penetrations, such as chimneys, vents, and skylights, can lead to water infiltration and subsequent damage. Flashing serves as a protective barrier against water intrusion in vulnerable areas of the roof where two different materials meet. For example, improperly sealed flashing around a chimney can result in leaks and moisture seepage into the attic or interior spaces.
- Clogged or Misaligned Gutters: Clogged or misaligned gutters and downspouts can cause water to overflow and accumulate along the roof edges, leading to potential water damage. Properly functioning gutters are essential for directing rainwater away from the roof and foundation of the building. For instance, debris buildup in gutters can prevent proper drainage, causing water to back up and seep under roofing materials.
- Lack of Proper Ventilation: Inadequate ventilation in the attic can create moisture buildup, which can compromise the integrity of the roof structure over time. Proper ventilation helps regulate temperature and humidity levels in the attic, preventing condensation that can lead to mold growth and wood rot. For example, a poorly ventilated attic can trap heat and moisture, accelerating the deterioration of roofing materials.
- Damaged or Missing Shingles: Damaged or missing shingles expose the underlying roof substrate to water infiltration, increasing the risk of leaks and structural damage. Shingles act as a protective layer that shields the roof from harsh weather elements. For instance, cracked or curled shingles can allow water to penetrate the roof deck, causing internal water damage.
- Poorly Positioned Water Shield: Incorrect placement or insufficient coverage of water shield materials can leave the roof vulnerable to water penetration and leaks. Water shields play a major role in preventing water intrusion in critical areas such as eaves, valleys, and roof penetrations. For example, inadequate water shield coverage at roof edges can result in ice dams and water seepage during heavy rainfall or snowmelt.
- Faulty Seals Around Roof Penetrations: Improper sealing around roof penetrations like vent pipes and HVAC units can create entry points for water infiltration. Watertight seals are essential to prevent leaks and maintain the integrity of the roof system. For instance, deteriorated sealant around a vent pipe can allow water to enter the roof structure, causing damage over time.
- Aging Roofing Materials: Aging roofing materials are more susceptible to wear and deterioration, increasing the likelihood of water damage. Over time, exposure to environmental factors can weaken roofing components, compromising their ability to repel water effectively. For example, aging asphalt shingles may lose their granules and flexibility, making them prone to cracking and water penetration.
- Inadequate Maintenance Practices: Neglecting regular roof maintenance, such as inspections and repairs, can lead to undetected issues that may result in water damage over time. Routine maintenance helps identify potential vulnerabilities and address them proactively to prevent costly repairs. For instance, failure to address small leaks quickly can escalate into larger water damage issues that require extensive remediation efforts.
- Tree Overhangs and Debris Accumulation: Tree overhangs and debris accumulation on the roof can trap moisture, promote mold growth, and create conditions for water damage. Overhanging branches can rub against the roof, damaging the shingles and creating entry points for water. Fallen leaves, twigs, and debris can block drainage pathways, leading to water pooling and potential leaks.
- Impact of Harsh Weather Events: Harsh weather events such as storms, hail, heavy rainfall, and strong winds can test the resilience of a roof system and expose vulnerabilities to water damage. Extreme weather conditions can cause immediate damage or exacerbate existing weaknesses in the roofing structure. For example, severe hailstorms can puncture roofing materials, compromising their waterproofing capabilities and leading to leaks.
How to Select the Right Water Shield for Your Roof
- Consider Climate Factors: Take into account the climate of your region when selecting a water shield for your roof. Different climates may require specific water shield characteristics to withstand varying temperature ranges, precipitation levels, and environmental conditions. For example, areas prone to heavy rainfall may benefit from water shields with enhanced water-resistance properties.
- Evaluate Roof Design and Complexity: Evaluate your roof’s design and complexity to determine the type of water shield that best suits your needs. Factors such as roof slope, shape, and number of penetrations influence the choice of water shield material and installation method. For instance, roofs with multiple valleys or dormers may require a more robust water shield to ensure comprehensive coverage.
- Assess Longevity and Durability: Consider the longevity and durability of different water shield materials before making a selection. Opt for high-quality water shields that offer superior resistance to UV exposure, temperature fluctuations, and mechanical stress. Investing in durable materials can extend the lifespan of your roof and enhance its protection against water damage.
- Review the Manufacturer’s Recommendations: Review the manufacturer’s recommendations and specifications for the water shield products you are considering. Manufacturers provide guidance on proper installation techniques, coverage requirements, and compatibility with other roofing materials. Following these recommendations ensures the optimal performance of the water shield in protecting your roof.
- Check Building Codes and Regulations: Check local building codes and regulations to guarantee compliance when choosing a water shield for your roof. Building codes may specify minimum requirements for water resistance, fire ratings, and installation methods. Adhering to these codes helps guarantee the safety and structural integrity of your roof system.
- Compare Different Water Shield Options: Compare different types of water shield options available on the market to find the most suitable one for your roof. Evaluate factors such as cost, ease of installation, maintenance requirements, and performance characteristics. For example, self-adhering modified bitumen membranes may offer ease of installation compared to traditional asphalt felt underlayment.
- Consult with Roofing Professionals: Seek advice from roofing professionals or contractors to get recommendations on the best water shield for your specific roofing needs. Experienced professionals can assess your roof’s requirements, recommend suitable products, and ensure proper installation for optimal performance. Consulting with experts can help you make an informed decision and avoid potential issues in the future.
- Consider Additional Features: Consider additional features or enhancements offered by certain water shield products, such as self-sealing properties, anti-slip surfaces, or impact resistance. These features can provide added protection and durability to your roof system, especially in areas prone to severe weather conditions or high foot traffic.
- Factor in Installation Costs and Labor: Factor in installation costs and labor requirements when selecting a water shield for your roof. Some water shield materials may be more expensive upfront but offer long-term cost savings through reduced maintenance and enhanced durability. Consider the overall value proposition of the water shield in terms of performance and installation efficiency.
- Prioritize Compatibility with Roofing Materials: Prioritize compatibility with existing or planned roofing materials when choosing a water shield. Just make sure that the selected water shield complements the characteristics of your roof coverings, flashing components, and underlayment systems to create a seamless and effective waterproofing barrier. Compatibility between materials minimizes the risk of compatibility issues that could compromise the roof’s integrity.
Proper Installation Techniques for Maximum Protection
- Ensure Clean and Dry Substrate: Before installing any water shield, make sure the substrate is clean and dry to promote proper adhesion and prevent moisture entrapment. A clean and dry surface allows the water shield to adhere effectively and form a strong bond with the roof deck, minimizing the risk of water infiltration.
- Use Proper Overlapping Technique: Implement the correct overlapping technique recommended by the manufacturer when installing the water shield to create a continuous and seamless barrier against water intrusion. Proper overlapping makes sure that water cannot penetrate through gaps or seams in the water shield, enhancing its protective capabilities.
- Secure Edges and Seams Adequately: Secure the edges and seams of the water shield with appropriate adhesives, fasteners, or sealants to prevent lifting, curling, or separation over time. Adequately securing the edges and seams makes sure that the water shield remains intact and watertight, even under challenging weather conditions.
- Apply Pressure for Full Adhesion: Apply pressure to the installed water shield to ensure full adhesion and eliminate air pockets or wrinkles that could compromise its effectiveness. Proper pressure application helps the water shield conform to the roof surface smoothly, maximizing its contact for optimal waterproofing performance.
- Integrate with Flashing and Roof Penetrations: Integrate the water shield seamlessly with flashing components and around roof penetrations to create a continuous waterproofing system. Proper integration makes sure that vulnerable areas where water could enter the roof are effectively sealed and protected against leaks.
- Inspect for Proper Coverage: Regularly inspect the installed water shield to verify proper coverage and address any areas that may be inadequately protected. Checking for proper coverage helps identify potential vulnerabilities or gaps in the waterproofing barrier that could lead to water damage if left unaddressed.
- Follow the manufacturer’s guidelines: Adhere to the manufacturer’s installation guidelines and recommendations when installing the water shield to get the right application and maximum protection. Following specific instructions provided by the manufacturer guarantees that the water shield performs as intended and meets quality standards for waterproofing.
- Seal Joints and Transitions Carefully: Seal joints, transitions, and overlaps in the water shield carefully with compatible sealants or tapes to maintain continuity and prevent water infiltration at critical connection points. Properly sealed joints enhance the water shield’s ability to resist leaks and provide long-term performance.
- Protect Exposed Edges: Protect exposed edges of the water shield from damage or degradation by using appropriate edge treatments or flashing details. Shielding exposed edges helps maintain the integrity of the water shield over time, preventing premature wear and preserving its waterproofing properties.
- Document Installation for Future Reference: Document the installation process of the water shield for future reference, maintenance, or warranty purposes. Keeping detailed records of the installation makes sure that any potential issues or warranty claims can be addressed efficiently and accurately in the future.
The Role of Roof Pitch in Water Shield Placement
The roof pitch plays a significant role in determining the placement and effectiveness of water shields in preventing water infiltration and damage. The pitch of the roof affects the speed and direction of water runoff, influencing where water is most likely to accumulate or flow.
For low-pitched roofs, where water may pool or move slowly, strategic placement of water shields along vulnerable areas such as valleys and eaves is the key to redirecting water away from potential leak points. On steeply pitched roofs, rapid water runoff can put more stress on the water shields, necessitating secure installation and proper overlap to withstand the force of flowing water.
Understanding Ice Dams and Water Shield Placement to Prevent Them
The melting and refreezing of snow on the roof causes ice dams, a common winter roofing problem that can result in water backup and potential leaks. Proper water shield placement is essential in preventing ice dams by creating a watertight barrier that prevents melted snow from seeping under roofing materials.
Placing water shields along eaves, valleys, and roof edges where ice dams typically form helps redirect water away from vulnerable areas and maintain the integrity of the roof system.
The Importance of Overlapping and Sealing in Water Shield Installation
Proper overlapping and sealing are crucial aspects of water shield installation to maintain a seamless and effective barrier against water infiltration. Overlapping the water shield correctly according to manufacturer guidelines creates a continuous layer that prevents water from seeping through gaps or seams.
Securely sealing edges, seams, and transitions with appropriate adhesives or sealants further reinforces the waterproofing integrity of the system, preventing potential leaks and water damage.
Climatic Considerations for Water Shield Placement
- Temperature Fluctuations: Consider temperature fluctuations in your region when placing water shields on the roof. Extreme temperature variations can impact the flexibility and adhesion of water shield materials, affecting their performance over time. For instance, in areas with significant temperature changes between seasons, choosing a water shield with good thermal stability is essential to withstand these fluctuations without compromising its waterproofing capabilities.
- Precipitation Levels: Take into account the average precipitation levels in your area to determine the optimal placement of water shields for effective water management. Regions with high rainfall or snowfall require robust water shields that can handle increased moisture exposure and prevent water infiltration. For example, in areas prone to heavy snow accumulation, proper water shield placement along eaves and valleys helps prevent ice dams and water penetration during thawing periods.
- Humidity Levels: Evaluate the humidity levels in your climate, as high humidity can contribute to moisture buildup in the roof structure if not adequately managed. Proper placement of water shields in areas susceptible to moisture intrusion, such as roof penetrations and valleys, helps minimize the risk of condensation and mold growth. For instance, choosing water shields with improved moisture resistance can aid in preventing damage to the roof from potential high humidity levels.
- Wind Exposure: Factor in the prevailing wind patterns and exposure of your property when determining water shield placement to withstand wind-driven rain or debris. Strong winds can push water under roofing materials, compromising the effectiveness of the water shield if it is not properly positioned. Ensuring secure installation and strategic placement of water shields along wind-exposed areas can fortify the roof against water ingress and wind damage.
- Sun Exposure: Take into consideration the level of sun exposure your roof receives to select water shields that can withstand UV radiation and prolonged sunlight exposure. Intense sunlight can degrade certain water shield materials over time, leading to premature deterioration and reduced waterproofing performance. Choosing UV-resistant water shields and positioning them in sunlight-exposed areas can help prolong their lifespan and maintain their protective qualities against solar damage.
Maintenance Tips for Prolonging the Life of Your Water Shield
- Regular Inspections: Conduct regular inspections of the water shield to check for any signs of damage, wear, or deterioration. Inspecting the water shield allows you to identify potential issues early on and address them right away to prevent water infiltration and structural damage. Look for tears, punctures, lifted edges, or areas where the water shield may have been compromised.
- Clear Debris Buildup: Keep the roof surface clear of debris, such as leaves, branches, and dirt, to prevent debris buildup that can trap moisture and compromise the effectiveness of the water shield. Regularly clearing debris from the roof helps maintain proper drainage and prevent blockages that could lead to water pooling or leaks. Pay attention to areas around roof penetrations and valleys where debris tends to accumulate.
- Address Sealant Maintenance: make sure sealants used to secure edges, seams, and transitions of the water shield are in good condition and intact. Periodically check the sealant for any signs of cracking, peeling, or deterioration that may compromise its waterproofing function. Reapply sealant as needed to maintain a watertight seal and prevent water from seeping through gaps.
- Trim Overhanging Branches: Trim overhanging tree branches that could rub against the roof surface and damage the water shield over time. Branches in contact with the roof can cause abrasions, scratches, or punctures in the water shield, weakening its protective properties. Keeping tree limbs trimmed back can help prevent unnecessary wear and tear on the water shield.
- Monitor Roof Traffic: Limit foot traffic on the roof to minimize the risk of accidental damage to the water shield. Excessive walking or work on the roof can cause abrasions, tears, or displacement of the water shield material, compromising its ability to keep water out. Establish guidelines for roof access and educate individuals on the importance of avoiding unnecessary pressure on the water shield.
- Prompt Repairs: Address any identified issues or damage to the water shield as soon as possible by making necessary repairs or replacements. Delaying repairs can escalate minor problems into more significant issues that may require costly remediation efforts. Whether it’s resealing seams, patching tears, or replacing damaged sections of the water shield, timely maintenance is key to prolonging its lifespan and protecting the roof structure from water damage.
Troubleshooting Common Water Shield Issues
- Leaks and Water Infiltration: Address leaks and water infiltration issues by inspecting the water shield for damage, gaps, or inadequate coverage that may be allowing water to penetrate the roof. Trace the source of the leak to identify the specific area of the water shield that requires repair or reinforcement. Properly seal any damaged areas or gaps in the water shield to prevent further water intrusion and protect the underlying roof structure from moisture damage.
- Blisters or Bubbling: Investigate blisters or bubbling in the water shield, which can indicate trapped moisture or improper installation. Blisters may form due to poor adhesion, inadequate surface preparation, or trapped air during installation. Carefully flatten out any blisters, get the right adhesion to the substrate, and address the root cause of the issue to prevent future blistering and maintain the integrity of the water shield.
- Edge Curling or Lifting: Resolve edge curling or lifting of the water shield by resealing edges and seams with appropriate adhesives or sealants. Edge curling can occur due to insufficient bonding, exposure to weather elements, or aging of the material. Securely reattach the curled edges to the roof surface and reinforce them to prevent further lifting that can compromise the waterproofing properties of the water shield.
- Cracking or Brittle Material: Address cracking or brittleness in the water shield, which can reduce its flexibility and waterproofing capabilities over time. Cracking may result from UV exposure, temperature fluctuations, or the aging of the material. Replace cracked or brittle sections of the water shield with new material to maintain a reliable barrier against water intrusion and provide long-term protection for the roof.
- Poor Drainage or Ponding: Improve drainage and address ponding issues on the roof surface by ensuring that the water shield is correctly installed to promote proper water runoff. Ponding water can put excess stress on the water shield and lead to leaks or deterioration. Adjust the placement of the water shield in areas prone to ponding, such as flat roofs or low-slope sections, to enhance drainage and prevent water accumulation that can compromise the roof’s integrity.
- Discoloration or Mold Growth: Investigate discoloration or mold growth on the water shield surface, which may indicate moisture retention or inadequate ventilation in the roof system. Discoloration can result from algae growth, mold development, or chemical reactions with environmental factors. Address mold growth as soon as possible by improving ventilation, eliminating excess moisture sources, and cleaning or treating affected areas of the water shield to prevent further discoloration and maintain a healthy roofing environment.
Enhancing Roof Longevity with Supplemental Water Shield Measures
Supplemental water shield measures can greatly enhance the longevity of roofs by providing an additional layer of protection against moisture infiltration and water damage.
Installing features such as ice and water shields, self-adhering membranes, or flashing details at vulnerable areas like roof valleys, eaves, and penetrations can effectively prevent water penetration and extend the lifespan of the roofing system. These supplemental measures act as a barrier to prevent water from seeping into the underlying structure, reducing the risk of leaks, rot, and mold growth.