When embarking on the task of removing shingles from a roof, one might wonder where to begin. This seemingly simple question can significantly impact the efficiency and safety of the project. In this article, we’ll explore the pros and cons of starting at various points on the roof and provide practical advice for homeowners and professionals alike.
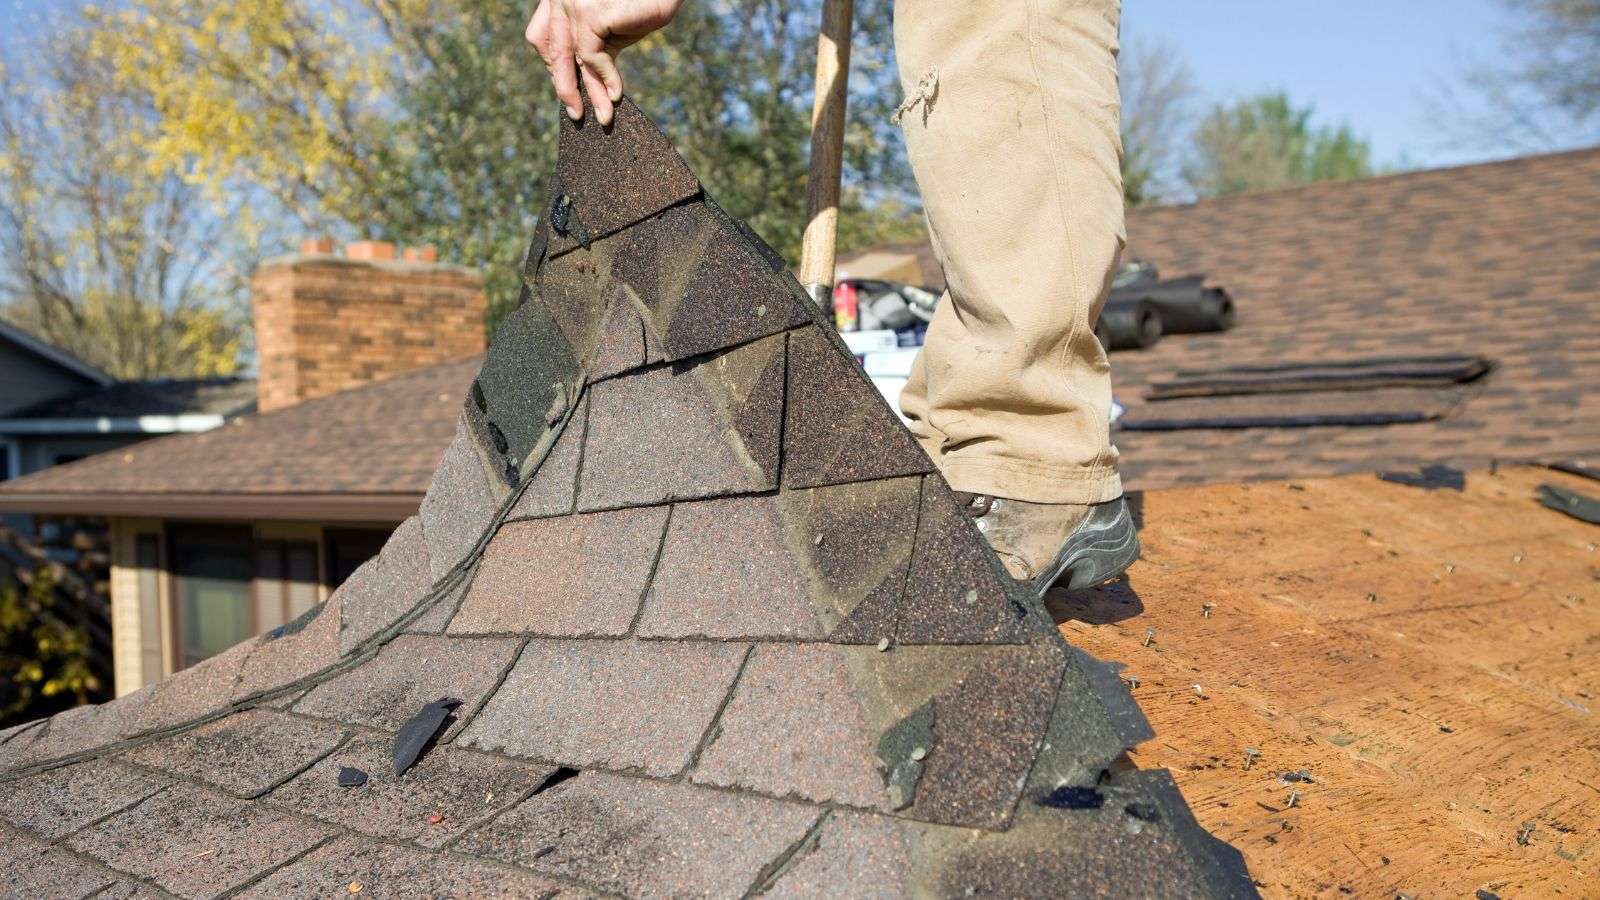
Start at the Top or Bottom When Removing Shingles
When removing shingles from a roof, it is generally recommended to start at the top rather than the bottom. Starting at the peak of the roof and working your way down offers several advantages. First, it ensures safety and efficiency during the removal process. Starting at the highest point lowers the possibility of injury to you or your team because falling debris, like nails and old shingles, can be easily directed into a dumpster or debris chute located below.
starting at the top exposes the nails holding the uppermost shingles, making it easier to remove them. This methodical approach allows for a systematic removal process, row by row, from the peak to the eaves, ensuring a more organized and controlled workflow. While there may be situations where starting from the bottom could be considered, such as dealing with multiple layers of shingles, starting at the top generally provides easier access, reduces the risk of damage to underlying layers, prevents slipping hazards, and overall leads to a more efficient and safer shingle removal process.
5 Essential Tips for Efficient Shingle Removal
1. Use the Right Tools
Using the appropriate tools is essential for efficient shingle removal. A roofing shovel with a hooked claw is specifically designed to pry under shingles effectively. A pry bar can be handy for dealing with stubborn nails that need to be removed. Investing in high-quality tools will not only make the removal process smoother but also help prevent damage to the roof structure. Remember to handle these tools with care and follow safety guidelines to maintain a successful shingle removal project.
2. Protect Your Work Area
Protecting your work area is essential to prevent damage and maintain a safe environment during shingle removal. Lay down tarps or plywood sheets on the ground beneath the work area to catch falling debris such as old shingles and nails. This not only helps keep the surroundings clean but also protects landscaping and fixtures from potential damage. Taking the time to prepare and protect your work area can help streamline the cleanup process and ensure a more organized workspace.
3. Work Methodically
Approaching shingle removal methodically can enhance efficiency and safety throughout the project. It is best to remove shingles in sections rather than trying to tackle the entire roof at once. Working in small, manageable areas allows for better control over the process and reduces the risk of causing accidental damage to underlying layers or structures. Breaking down the task into smaller sections and progressing systematically can help maintain a steady pace while ensuring thoroughness and precision in shingle removal.
4. Be Mindful of Weather Conditions
Considering weather conditions is important when planning shingle removal to optimize safety and effectiveness. Avoid removing shingles during extreme weather conditions, such as very hot or cold temperatures, or when strong winds are present. Extreme weather can not only make the removal process more challenging but also pose safety risks for you and your team. Choosing suitable weather conditions for the task can help work more comfortably, minimize potential hazards, and achieve better results in a timely manner.
5. Follow Safety Guidelines and Local Building Codes
Adhering to safety guidelines and local building codes is paramount when undertaking shingle removal to maintain a secure working environment and compliance with regulations. Wear proper safety gear, including gloves, eye protection, a respirator, and sturdy shoes, to protect yourself from potential hazards. Familiarize yourself with local building codes related to roof work to avoid any violations and make sure that the removal process meets legal requirements. Prioritizing safety and compliance not only safeguards your well-being but also contributes to a professional and responsible approach to shingle removal projects.
Understanding the Anatomy of a Roof
Understanding the anatomy of a roof involves recognizing the various components that work together to provide structural integrity and protection for a building. A typical roof consists of several key elements, including the roof covering (such as shingles or tiles), underlayment (a protective layer beneath the roof covering), roof framing (rafters or trusses that support the roof structure), sheathing (a layer of boards or panels that form the roof deck), and flashing (metal pieces used to prevent water penetration at joints and intersections).
Ventilation components such as ridge vents and soffit vents are crucial for maintaining airflow and regulating temperature in the attic space. Gutters and downspouts help channel water away from the roof and foundation, preventing damage. Understanding how each part of the roof functions and interacts with the others is essential for proper maintenance, repair, and overall roof performance.
The Right Tools for the Job
Having the right tools for a job is essential for efficiency and safety in any task, including roofing projects. When it comes to roof work, specific tools are designed to make tasks like shingle removal, installation, and repairs more manageable.
Examples of essential tools for roofing projects include a roofing shovel with a hooked claw for prying up shingles, a pry bar for removing stubborn nails, a utility knife for cutting materials, a hammer for securing roofing materials, and a caulking gun for sealing joints and seams. Safety equipment such as gloves, eye protection, and sturdy footwear is the key to protecting against potential hazards. Investing in high-quality tools appropriate for the job not only guarantees a smoother workflow but also minimizes the risk of damage to the roof structure and increases overall project efficiency.
Safety Considerations in Shingle Removal
Safety considerations in shingle removal are paramount to protect both workers and the integrity of the structure. Before starting any shingle removal project, it’s best to prioritize safety by wearing appropriate personal protective equipment, such as gloves, eye protection, and sturdy shoes, to prevent injuries from sharp materials or falling debris. Ensuring a stable ladder setup and using fall protection equipment when working at heights are essential safety practices.
paying attention to weather conditions and avoiding extreme temperatures or strong winds can help maintain a safe working environment. Properly securing tools and materials to prevent them from falling off the roof and establishing clear communication among team members to coordinate movements and tasks further enhance safety during shingle removal.
Efficient Techniques for Stripping Shingles
When it comes to efficiently stripping shingles, employing effective techniques can streamline the process and ensure a successful outcome. One efficient technique is to work in small sections, focusing on one area at a time, to maintain control and prevent overwhelming debris buildup. Using a roofing shovel with a hooked claw or a pry bar can help pry up shingles effectively, starting from the top edge and working your way down.
You have to systematically remove shingles row by row, following a structured approach from the peak to the eaves, to maintain order and efficiency. Taking the time to remove all nails and debris as you progress prevents potential damage and injury. Utilizing the right tools, working methodically, and being mindful of safety considerations can help strip shingles efficiently while ensuring the integrity of the roof structure remains intact.
Managing Debris and Cleanup
Managing debris and cleanup is a vital aspect of any shingle removal project to maintain a safe and organized work environment. To effectively manage debris, using tarps or plywood sheets on the ground below the work area can help catch falling materials and prevent damage to landscaping or fixtures. Having a designated debris chute or dumpster in place can facilitate the efficient disposal of old shingles, nails, and other waste.
You have to regularly clear the work area of debris to prevent tripping hazards and make sure smooth progress is made during the removal process. Once the shingle removal is complete, thorough cleanup is essential to leave the area tidy and safe. This includes properly disposing of all debris, securing tools and equipment, and inspecting the site for any potential hazards. Staying organized, proactive in managing debris, and diligent in cleanup efforts can help ensure a successful shingle removal project while maintaining a clean and safe work environment.
Disposal and Recycling of Old Shingles
Disposal and recycling of old shingles are essential considerations to minimize environmental impact and adhere to waste management regulations. When disposing of old shingles, it is important to check with local authorities or waste management facilities for specific guidelines on proper disposal methods. Many areas have designated facilities for construction waste disposal, including shingles, where they can be safely disposed of. Recycling old shingles is a sustainable option that helps reduce the amount of waste sent to landfills.
Some recycling facilities accept asphalt shingles and process them for reuse in road construction or other applications. You may support sustainable waste management techniques and the environment by keeping recyclables separate from other debris during the removal process. Collaborating with recycling facilities or contractors specializing in shingle recycling can further support eco-friendly disposal practices and promote a more sustainable approach to roofing projects.
Preparing the Roof for New Shingles
- Inspect the Roof Structure: Before installing new shingles, it’s crucial to inspect the roof structure for any signs of damage or deterioration. Check for sagging areas, rotting wood, or water damage that may impact the integrity of the new roof. Dealing with any structural issues beforehand ensures a solid foundation for the new shingles and prevents potential problems in the future. For example, replacing damaged roof decking or reinforcing weak areas can enhance the longevity and performance of the new roof.
- Repair and Replace Underlayment: The underlayment plays a vital role in protecting the roof deck from moisture infiltration. Inspect the underlayment for tears, wrinkles, or other damage that may compromise its effectiveness. Repair or replace any damaged sections to get the right waterproofing and insulation beneath the new shingles. Using high-quality underlayment materials and properly installing them can improve the overall durability and weather resistance of the roof system.
- Address Ventilation Needs: Proper ventilation is essential for maintaining a healthy roof system and preventing issues such as moisture buildup and heat retention. Evaluate the existing ventilation system and make the necessary adjustments to maintain adequate airflow in the attic space. Installing ridge vents, soffit vents, or gable vents can help regulate temperature, reduce energy costs, and prolong the lifespan of the new shingles by preventing premature deterioration.
- Apply flashing correctly: flashing is essential for sealing joints, edges, and transitions on the roof to prevent water intrusion and leaks. Inspect existing flashing for signs of damage or deterioration and replace any compromised sections. Properly install new flashing around chimneys, skylights, vents, and other penetration points to create a watertight seal. Using high-quality flashing materials and meticulous installation techniques can enhance the waterproofing capabilities of the roof and protect against potential water damage.
- Clean and Prepare the Surface: Before installing new shingles, it’s important to clean the roof surface thoroughly to remove debris, dirt, and old roofing materials. Use a broom or blower to clear the roof of any loose particles and ensure a clean working environment. Inspect the roof for any protruding nails or damaged areas that may affect the installation of new shingles. Preparing a clean and smooth surface can help promote proper adhesion of the new shingles and achieve a professional-looking finish that enhances the overall aesthetic appeal and functionality of the roof.