Are you looking to install a leak-proof lead-pan shower? If so, you’ve come to the right place. In this guide, we will walk you through the five essential steps to a successful installation.
From selecting the best materials to sealing the seams and joints, we have you covered. So let’s dive in and learn how to create a leak-proof lead-pan shower that will give you peace of mind for years to come.
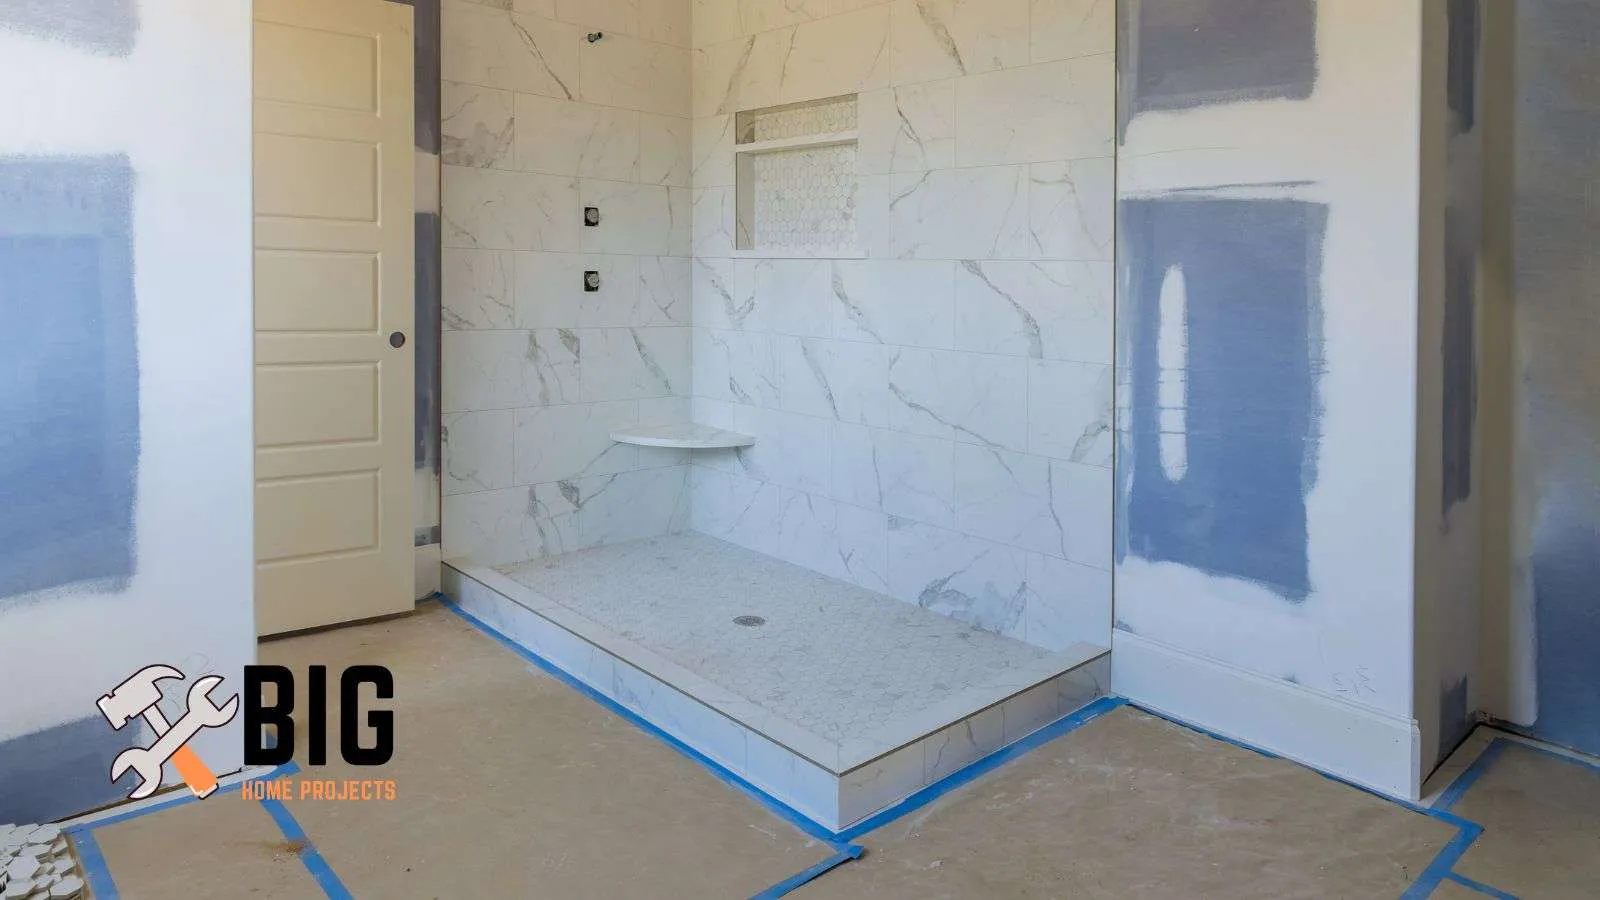
5 easy steps to installing a leak-proof lead pan shower
Step 1: Gather your materials
The first thing you need to do is gather all the necessary materials. These will include a lead shower pan that fits your shower floor, sharp utility knives, a hammer, roofing nails, silicone caulk, and a caulking gun.
Also included should be the plumber’s putty and some type of sealant for the drain. Having all your materials at hand before starting will save time and keep the process efficient.
Step 2: Prepare the shower floor
The next step is preparing your shower floor. Make sure it’s clean and free of debris.
It should also be level; any unevenness can cause the lead pan to not fit properly or cause water pooling in the future.
Use a leveling tool for this task. It’s also important to check that your subfloor material is compatible with using a lead pan.
Step 3: Install the lead pan
Carefully place the lead pan in position on the shower floor, ensuring it’s aligned with where your drain hole will be located.
Once it’s in place, use roofing nails to fasten it around the perimeter, but make sure not to puncture inside the basin area, as this might cause leaks.
Step 4: Connect the drain
Next up is connecting the drain. Apply some plumber’s putty around the underside of the flange area of the drain assembly.
Then insert it through the hole of your lead pan from above and screw it tight so that it forms a seal against leakage with the plumber’s putty pushing out slightly around its edges, which you can clean off later.
Step 5: Seal and test
The final step involves applying silicone caulk around where your lead pan meets walls or any other joining areas for added security against water leaks.
Allow adequate time for everything to dry based on manufacturer recommendations before testing by pouring some water into the shower base and checking if there are any leaks.
How do I prepare the subfloor and ensure proper drainage before installing a lead-pan shower?
To prepare the subfloor and ensure proper drainage before installing a lead pan shower, start by inspecting it for damage and repairing or replacing any affected areas.
Check that the subfloor has a sloped surface towards the drain to prevent water pooling, and use a leveling tool to ensure evenness.
Consider adding a vapor barrier to protect against moisture. Reinforce the subfloor in areas where heavy fixtures will be installed.
Install a functioning drainage system and test it by pouring water down the drain to verify efficient flow without backups or standing water.
The best materials for constructing a leak-proof lead pan shower
When constructing a leak-proof lead-pan shower, it is important to choose the right materials. Here are some recommendations for the best materials:
- Lead pan: Opt for a high-quality lead shower pan that is specifically designed for shower installations. Ensure that it is thick enough to withstand wear and tear while providing durability and longevity.
- Waterproofing membrane: Use a reliable waterproofing membrane or liner to provide an additional layer of protection against water leaks. Look for products that are specifically formulated for showers and have good adhesive properties.
- Caulk and sealant: Select a high-quality silicone caulk or sealant that is specifically intended for use in wet environments such as showers. This will help create watertight seals around joints, corners, and any other areas where the lead pan meets other surfaces.
- Fasteners: Choose appropriate fasteners, such as stainless steel roofing nails or screws, to secure the lead pan in place without compromising its integrity or causing leaks.
- Drain assembly: Ensure you have a well-designed drain assembly with good-quality components, including a proper drain flange, gaskets, and screws. Consider using a plumber’s putty or another suitable sealing material to create an effective seal around the drain area.
- Subfloor materials: Use subfloor materials that are compatible with installing a lead pan shower. Common options include cement board, fiber cement sheets, or waterproof plywood.
How do I properly seal the seams and joints to prevent leaks in a lead-pan shower?
To properly seal the seams and joints in a lead pan shower and prevent leaks, follow these steps:
First, clean and dry the surfaces thoroughly to ensure proper adhesion.
Apply a high-quality silicone caulk or sealant along the seams where the lead pan meets the walls, corners, and any other joining areas. Use a caulking gun for precise application.
Smooth out the caulk with your finger or a caulk smoothing tool to create a tight seal. Pay extra attention to any gaps or uneven areas.
Apply caulk around the drain flange and any other fittings or fixtures connected to the lead pan.
Allow sufficient time for the caulk to cure according to manufacturer instructions before testing for leaks by pouring water into the shower base and observing for any signs of moisture escaping from sealed areas.
Guide on waterproofing the lead pan shower area before tiling
- Clean and prepare: Start by cleaning the lead pan and ensuring it is free of any dust, debris, or moisture. Allow it to dry completely before proceeding with the waterproofing process.
- Apply primer: Use a suitable primer specifically formulated for bonding to lead surfaces. Apply the primer according to the manufacturer’s instructions, using a brush or roller. Ensure even coverage over the entire surface of the lead pan.
- Waterproofing membrane: Next, apply a waterproofing membrane to provide an additional layer of protection against water infiltration. Choose a membrane that is compatible with lead and is designed for shower applications. Cut the membrane into suitable-sized pieces that can be easily managed during installation.
- Start with the walls: Begin by applying the waterproofing membrane to the walls adjacent to the shower area. Use a paintbrush or roller to apply a layer of liquid waterproofing membrane to the wall surface in long, even strokes. Apply multiple coats as necessary, allowing sufficient drying time between each coat.
- Cover horizontal surfaces: Extend the waterproofing membrane onto horizontal surfaces such as shower benches, curbs, and ledges within the shower area. Again, use a brush or roller to apply coats of liquid membrane, ensuring complete coverage.
- Seal corners and joints: Pay special attention to corners and joints where different surfaces meet (e.g., walls and floors). Apply self-adhesive waterproofing strips or fabric tape to these areas to reinforce them and create watertight seals.
- Seal floor-to-wall transition: Apply a generous amount of liquid waterproofing membrane along the floor-to-wall transition area where the lead pan meets the walls. Use a trowel or brush to ensure proper coverage and seal any gaps or seams.
- Allow adequate drying time: Follow the manufacturer’s instructions regarding drying time between coats and for the final curing period. Ensure that the waterproofing membrane has fully cured before proceeding with tile installation.
Common mistakes to avoid during the process of installing a lead pan shower
- Insufficient subfloor preparation: Neglecting to properly prepare the subfloor can result in an uneven or unstable surface, which may cause the lead pan to not fit correctly or lead to leaks in the future. Ensure that the subfloor is clean, level, and structurally sound before proceeding with the installation.
- Poorly securing the lead pan: Improperly securing the lead pan can result in movement or shifting over time, leading to potential leaks. Use appropriate fasteners like roofing nails or screws around the perimeter of the pan, ensuring a secure and tight fit while being careful not to puncture the basin area.
- Inadequate sealing around joints and seams: Failing to properly seal joints and seams can allow water to penetrate and cause leaks. Take extra care when applying silicone caulk or sealant along all seams, corners, and where different surfaces meet. Ensure thorough coverage and create watertight seals.
- Incorrect drain installation: An improperly installed drain can cause leakage issues in your lead pan shower. Follow the manufacturer’s instructions carefully when connecting the drain assembly, using plumber’s putty or appropriate sealing materials for a secure and watertight connection.
- Skipping waterproofing step: Waterproofing is a crucial step in preventing water damage and leaks. Skipping this step can result in costly repairs down the line. Apply a suitable waterproofing membrane or liner to walls, floors, and any other areas requiring waterproofing before tiling.
- Neglecting proper slope for drainage: A lack of adequate slope towards the drain can cause water pooling instead of effective drainage within your shower area. Ensure that your subfloor is appropriately sloped towards the drain prior to installing the lead pan.
Tools or equipment needed for the installation of a leak-proof lead pan shower
To install a leak-proof lead-pan shower, you will need specific tools and equipment.
These include a lead shower pan that fits your shower area, a sharp utility knife for cutting and trimming materials, a hammer to secure the lead pan with roofing nails or screws, and a caulking gun for applying silicone caulk or sealant along joints and seams.
You will also need a plumber’s putty for creating a watertight seal around drain fittings and a leveling tool to ensure proper leveling of the subfloor and lead pan.
Finally, you’ll need a high-quality silicone caulk or sealant designed for wet environments.
Having these tools ready will make the installation process smoother and increase the likelihood of achieving a leak-proof result.
Maintenance tips can help prolong the life of a leak-proof lead pan shower
- Regular cleaning: Clean your lead pan shower regularly to prevent the buildup of soap scum, grime, and mineral deposits. Use non-abrasive cleaners or mild solutions recommended for lead surfaces.
- Avoid harsh chemicals: Avoid using harsh chemicals or abrasive cleaners that can damage the surface of the lead pan or degrade sealants. Stick to gentle cleaning products that won’t compromise the integrity of the materials.
- Inspect seals and caulking: Periodically inspect the seals and caulking around joints, seams, and drain areas for any signs of wear or deterioration. If you notice any cracks or gaps, promptly repair or reapply silicone caulk or sealant to maintain watertightness.
- Monitor drainage: Keep an eye on the drainage performance of your shower. If you notice slow drainage or standing water, there might be a clog in the drain system. Address it promptly to prevent potential backups and leaks.
- Address leaks promptly: If you do detect any leaks, even minor ones, take immediate action to fix them. Investigate the source of the leak and replace damaged sealants if necessary. Ignoring leaks can lead to water damage and costly repairs down the line.
- Prevent moisture buildup: Ensure proper ventilation in your bathroom to minimize excess moisture buildup. Use exhaust fans during showers and leave bathroom doors open after use to allow air circulation and aid in drying.
- Avoid impact damage: Be mindful not to drop heavy objects or apply excessive force that could cause damage to the lead pan’s surface or compromise its waterproofing.
Alternative methods or products for creating a leak-proof shower base
There are alternative methods and products available for creating a leak-proof shower base instead of using a lead pan.
One popular alternative is a pre-formed shower base made of materials such as fiberglass, acrylic, or solid surface.
These bases come in various shapes and sizes and often have built-in slopes for proper drainage.
They are designed to be durable, waterproof, and easy to clean.
Another option is to use a liquid-applied waterproofing membrane system that involves applying multiple layers of specialized coatings directly onto the shower floor and walls.
This method provides flexibility in design and can offer excellent waterproofing when properly installed according to manufacturer guidelines.
How long does it take to complete the installation of a leak-proof lead pan shower?
The time required to complete the installation of a leak-proof lead pan shower can vary depending on several factors, including the size and complexity of the project, the level of expertise of the installer, and any additional customization or preparation needed.
A straightforward installation without complications can take anywhere from a few days to a week to complete.
This includes tasks such as preparing the subfloor, installing the lead pan, connecting drain fittings, waterproofing, tiling (if applicable), and sealing.
It is important to allocate sufficient time for each step and allow for proper drying and curing periods according to manufacturer guidelines.
Other interesting articles: