Leaky pipes can be a headache for homeowners, causing water damage and leading to costly repairs if not addressed promptly. Knowing how to identify a sealed pipe is essential to preventing further issues and ensuring a successful repair.
In this article, we’ll discuss ways to verify that a leaky pipe has been properly sealed, the signs to look for, and the steps to follow for an effective sealing process.
How to tell if the leaky pipe is sealed
To determine if a leaky pipe is properly sealed, you can follow these steps:
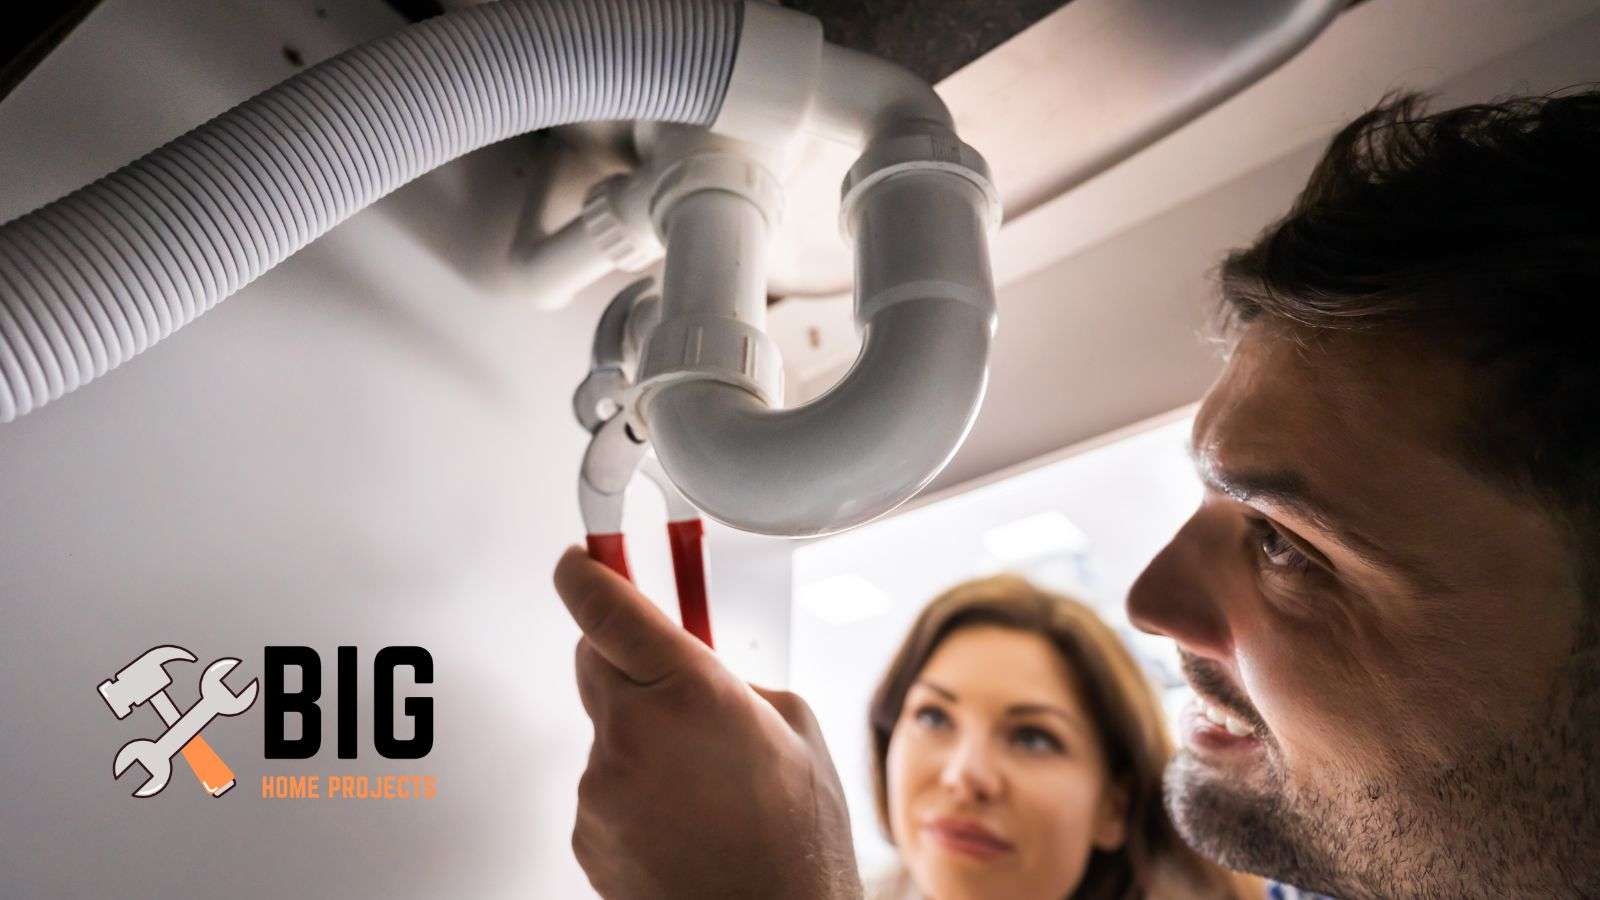
Visual inspection is crucial, so check the area around the pipe for signs of moisture, water stains, or puddles. Dry the area completely before proceeding.
Monitor the water pressure and check for drips or small water drops on the pipe joints. Feel for moisture along the pipe surface and joints.
Monitor your water usage meter for any sudden increases. Promptly addressing leaks is essential to preventing water damage and structural issues.
7 ways to verify a pipe seal was done right
1. Visual inspection
Perform a thorough visual inspection of the sealed pipe to ensure it was done correctly. Look for any signs of moisture, water stains, or puddles around the area where the pipe was sealed. Additionally, check for any visible gaps or cracks in the sealant or pipe joints. If you notice any of these issues, it may indicate that the sealing was not done properly.
2. Pressure test
A pressure test is an effective way to verify the integrity of a sealed pipe. Close off any valves or outlets connected to the pipe and apply pressure using a pressure gauge or pump. Monitor the pressure gauge for any significant drops over a period of time. If the pressure remains stable, it suggests that the sealing was done correctly. However, if the pressure drops, it indicates a potential leak that needs to be addressed.
3. Thermal imaging
Using a thermal imaging camera can help detect any temperature variations along the sealed pipe. Run hot or cold water through the pipe and observe the thermal image. Any abnormal temperature patterns or hotspots may indicate an improper seal or a leak. This method can be particularly useful for identifying hidden leaks that may not be visible to the naked eye.
4. Dye testing
Dye testing involves adding a colored dye to the water supply and observing if any of it escapes through the sealed pipe. Allow the dye to flow through the system for a period of time, and then inspect the area around the seal for any traces of the colored dye. If the dye is detected outside the sealed area, it indicates that the sealing was not effective.
5. Sound test
By tapping or gently striking the sealed pipe with a tool, you can listen for any unusual sounds. A properly sealed pipe should produce a solid, dull sound when tapped. If you hear a hollow or ringing sound, it may suggest that the seal is not secure or that there is a gap in the pipe joint.
6. Moisture detection
Using a moisture meter or a dampness sensor, check the area around the sealed pipe for any excessive moisture. High moisture levels or a continuous presence of moisture may indicate a failed seal or an active leak. It’s important to ensure that the surrounding area remains dry to prevent any potential water damage.
7. Professional inspection
If you are uncertain about the effectiveness of the pipe sealing, it is advisable to seek the assistance of a professional plumber or technician. They have the expertise and specialized equipment to thoroughly inspect and verify if the sealing was done correctly. A professional inspection can provide a comprehensive assessment and ensure the longevity and reliability of the sealed pipe.
Immediate signs that a pipe has been successfully sealed
- Absence of water leaks: The most obvious sign is that there are no visible signs of water leaks or drips around the sealed pipe. If the sealing has been done correctly, there should be no water escaping from the pipe or any moisture present in the surrounding area.
- Stable water pressure: When you turn on the water supply, the water pressure should remain consistent. If the pressure remains stable without any sudden drops, it indicates that the seal is effective and there are no leaks compromising the water pressure.
- Dryness: The area around the sealed pipe should be dry. If you have previously noticed water stains, dampness, or puddles, and they are now absent after the sealing, it indicates that the pipe has been successfully sealed.
- No unusual sounds: A properly sealed pipe should not produce any unusual sounds such as hissing, gurgling, or dripping noises. If you don’t hear any of these sounds when using the water supply, it suggests that the seal is intact and there are no leaks.
- Water flow control: The ability to control the flow of water through the sealed pipe is another indication of successful sealing. If you can turn the water supply on and off without any issues, it suggests that the seal is secure and there are no leaks affecting the flow.
How do I verify the pipe is sealed using a water pressure check?
- Close off valves: Ensure that all valves connected to the pipe you want to test are completely closed. This includes any outlet valves or faucets that are connected to the pipe.
- Attach a pressure gauge: Attach a pressure gauge to a nearby faucet or an access point that is part of the same water supply system as the pipe you want to test. Make sure it is tightly secured.
- Turn on the water supply. Slowly turn on the water supply to allow water to flow into the pipe. Start with a low water flow initially to prevent sudden pressure surges.
- Observe the pressure reading: Monitor the pressure gauge and note the initial pressure reading. A properly sealed pipe should maintain a stable pressure without any significant drops over time.
- Wait and monitor: Allow the water to flow through the pipe for a few minutes while keeping an eye on the pressure gauge. If the pressure remains steady without any noticeable changes, it suggests that the pipe is sealed properly.
- Check for pressure drops. If you notice a sudden drop in pressure on the gauge, it could indicate a potential leak or an issue with the seal. In such cases, you may need to further investigate and repair the pipe to ensure a proper seal.
- Repeat the test: If you have concerns about multiple sections of the pipe, repeat the pressure check for each section separately. This will help identify any specific areas that may require attention.
Common mistakes to avoid while sealing a leaky pipe
- Insufficient cleaning: Failing to thoroughly clean the pipe and the surrounding area before sealing is a common mistake. Make sure to remove any dirt, debris, or corrosion from the pipe surface. Proper cleaning ensures better adhesion and improves the effectiveness of the seal.
- Incorrect sealant selection: Choosing the wrong type of sealant for the specific pipe material and the type of leak can lead to ineffective sealing. It’s crucial to select a sealant that is compatible with the pipe material and is designed for the type of leak you are dealing with. Consult with a professional or read the manufacturer’s instructions to choose the appropriate sealant.
- Inadequate drying time: Rushing the drying time of the sealant can compromise the effectiveness of the repair. Follow the recommended drying or curing time specified by the sealant manufacturer. Allowing sufficient drying time ensures that the sealant fully sets and forms a tight bond with the pipe, minimizing the risk of future leaks.
- Overlooking proper application technique: Applying the sealant improperly can result in an ineffective seal. It’s important to follow the instructions provided by the sealant manufacturer, including the recommended application technique and amount to use. Apply the sealant evenly and ensure it covers the entire area of the leak.
- Ignoring safety precautions: Neglecting safety precautions while sealing a leaky pipe can lead to accidents or injuries. Always ensure proper ventilation in the area, wear appropriate protective gear (such as gloves and goggles), and use tools correctly. Additionally, be cautious when working with hot water or pipes to avoid burns.
- Neglecting professional help: Some leaks or pipe issues may require the expertise of a professional plumber. Trying to seal complex or major leaks without proper knowledge and experience can worsen the problem. If you are unsure about the severity of the leak or lack confidence in your repair skills, it’s best to seek professional assistance.
What are the preliminary steps before sealing a leaky pipe?
- Identify the source of the leak. Locate the exact source of the leak by inspecting the pipe carefully. Look for signs of water stains, dampness, or pooling water. Identifying the source will help you determine the best approach for sealing the pipe.
- Turn off the water supply. Shut off the water supply to the affected pipe by closing the nearest valve. This will prevent water from flowing through the pipe while you work on sealing the leak.
- Drain the pipe: To avoid any residual water causing further damage or hindering the sealing process, drain the pipe completely. Open all faucets connected to the pipe and allow the water to flow out until it stops.
- Clean the pipe surface: Thoroughly clean the area around the leak and the pipe surface itself. Remove any dirt, debris, or corrosion using a wire brush or sandpaper. Cleaning the surface ensures better adhesion for the sealant and improves its effectiveness.
- Dry the area: After cleaning, make sure to dry the pipe surface and the surrounding area completely. Use a towel or a cloth to remove any remaining moisture. Dry conditions will help the sealant adhere properly and minimize the risk of future leaks.
- Prepare the sealant: Depending on the type of sealant you are using, follow the manufacturer’s instructions to prepare it. This may involve mixing components or preparing the sealant in a specific way. Ensure that you have the necessary tools, such as a caulk gun, if required for the application.
Which tools are needed to seal a leaky pipe?
- Adjustable wrench or pipe wrench: These wrenches are used to loosen and tighten pipe fittings, allowing you to disconnect and reattach parts of the pipe if necessary.
- Pipe cutter or hacksaw: A pipe cutter or hacksaw may be required to cut out damaged sections of the pipe, especially if the leak is at a joint or in a specific area. This tool helps in removing the affected portion for repair or replacement.
- Emery cloth or sandpaper: These abrasive materials are used to clean the surface of the pipe and remove any rust, debris, or corrosion. Cleaning the pipe surface ensures better adhesion of the sealant.
- Sealant: Depending on the type of leak and the pipe material, you will need an appropriate sealant. Common options include plumber’s tape (PTFE tape), pipe dope, epoxy putty, or pipe sealant compound. Make sure to choose a sealant compatible with your specific pipe material and the type of leak you are addressing.
- Caulk gun: If you are using a sealant in tube or cartridge form, a caulk gun is necessary for easy dispensing and control of the sealant. The caulk gun allows you to apply the sealant evenly along the affected area of the pipe.
- Rags or towels: These are useful for wiping away any excess sealant, cleaning the pipe, and maintaining a dry work area.
- Safety equipment: It’s important to have appropriate safety equipment, such as gloves and safety glasses, to protect yourself during the repair process.
How do I choose the right sealant for a leaky pipe?
- Type of pipe material: Different pipe materials require different types of sealants. For example, sealants suitable for copper pipes may not be compatible with PVC or galvanized steel pipes. Ensure that the sealant you choose is designed for use with the specific pipe material you are working with.
- Type of leak: Consider the type and severity of the leak. Some sealants work better for small cracks or pinhole leaks, while others are more suitable for sealing pipe joints or larger leaks. Read the product labels or consult with a professional to determine if the sealant is appropriate for the specific type of leak you are dealing with.
- Compatibility: Ensure that the sealant is compatible with the substance or material that may come into contact with it. For example, if the pipe carries drinking water, choose a sealant that is safe for potable water systems. Similarly, if the pipe carries chemicals or gases, select a sealant that is resistant to those substances.
- Application method: Consider the ease of application. Some sealants come in tubes or cartridges that require a caulk gun for application, while others may be applied directly from a container. Choose a sealant that matches your comfort level and the accessibility of the leaky area.
- Drying and curing time: Take into account the drying and curing time of the sealant. Some sealants may require a longer drying time before they fully set, while others may cure rapidly. Consider your timeframe and ensure that you allow sufficient time for the sealant to dry and form a strong bond.
- Temperature and pressure resistance: If the pipe is exposed to high temperatures or experiences significant pressure, select a sealant that is specifically designed to withstand those conditions. Ensure that the sealant can handle the temperature and pressure levels of the pipe system.
Step-by-step guide: How to seal a leaky pipe
- Safety first: Put on appropriate safety gear such as gloves and safety glasses to protect yourself during the repair process.
- Turn off the water supply. Locate the nearest valve and shut off the water supply to the affected pipe. This will prevent water from flowing while you work on the repair.
- Drain the pipe: Open faucets connected to the pipe to drain any remaining water. Allow the water to flow out completely to ensure a dry work area.
- Clean the pipe: Use emery cloth or sandpaper to clean the surface of the pipe around the leak. Remove any dirt, debris, or corrosion to ensure better adhesion of the sealant.
- Apply the sealant: Depending on the type of sealant you are using, follow the manufacturer’s instructions for application. Apply the sealant directly to the leak or along the affected area. Ensure that the sealant covers the entire leak and extends slightly beyond it.
- Smooth and shape the sealant: Use your finger or a putty knife to smooth and shape the sealant, ensuring an even application. This helps create a tight seal and prevents water from seeping through.
- Allow the sealant to cure. Follow the recommended drying and curing times specified by the sealant manufacturer. This is crucial to ensuring that the sealant fully sets and forms a secure bond with the pipe.
- Turn on the water supply. Once the sealant has cured, turn on the water supply and check for any leaks. Monitor the repaired area closely to ensure that the seal is effective and there are no signs of water leakage.
- Clean up and test: Wipe away any excess sealant and clean the area. Test the repaired pipe by running water through it and checking for any further leaks.
What are the common indicators of a leaky pipe?
- Water stains or discoloration: Look for water stains or discoloration on walls, ceilings, or floors near the pipes. These stains may appear as brownish or dark spots and are often a sign of a hidden leak.
- Damp or moldy odor: If you notice a musty or moldy smell in a specific area of your home or near pipes, it could indicate a hidden leak. Moisture from a leaky pipe can promote mold growth, resulting in an unpleasant odor.
- Unexplained increase in water bills: If your water bills suddenly increase without any change in water usage patterns, it may be a sign of a hidden leak. Leaking pipes can lead to water waste, causing your bills to rise unexpectedly.
- Decreased water pressure: A leak in a pipe can cause a decrease in water pressure throughout your plumbing system. If you notice a significant drop in water pressure in one or more areas of your home, it could indicate a leak.
- Sounds of running water: If you hear the sound of running water even when no faucets are turned on, it suggests a possible leak. Pay attention to any hissing, dripping, or gurgling sounds coming from the walls, floors, or ceilings.
- Wet or damp areas: Notice any persistent wet or damp areas around your home, especially near the pipes. Puddles, damp carpets, or moisture on walls or floors may indicate a leaky pipe.
- Visible corrosion or rust: Check for signs of corrosion or rust on exposed pipes. Corrosion weakens the pipe and can lead to leaks over time. If you notice flaking, discoloration, or rough patches on the pipe surface, it may be a sign of a leak.
When should a professional plumber be called to manage a leaky pipe?
Calling a professional plumber to manage a leaky pipe is recommended in several situations.
If the leak is severe, causing significant water flow or extensive damage, or if it is a hidden leak that you cannot locate, it is best to seek professional help.
Burst pipes also require immediate attention from a plumber to prevent further damage.
If you lack plumbing knowledge or experience, or if your plumbing system is complex with multiple pipes and connections, it is advisable to call a professional plumber.
Professional plumbers are equipped to handle safety concerns such as gas leaks or exposed electrical wiring.
Their expertise ensures accurate assessment, appropriate repairs, and guidance for preventing future leaks, making it wise to seek their assistance when in doubt or dealing with complex or severe plumbing issues.
How do I prevent future pipe leaks after sealing?
To prevent future pipe leaks after sealing, it is important to implement several preventive measures.
Conduct regular inspections of your plumbing system to identify any potential issues early on, such as corrosion or loose fittings.
Maintaining proper water pressure is essential to prevent strain on pipes, so consider using a pressure regulator. Avoid using chemical drain cleaners, as they can corrode pipes over time.
Properly insulate pipes in colder areas of your home to protect them from freezing and potential bursts. Be mindful of clogs by avoiding flushing or draining items that can cause blockages.
Address plumbing issues promptly to prevent further damage. Consider scheduling regular maintenance with a professional plumber for inspections and necessary repairs.