Effective roof drainage is crucial to maintaining the integrity and longevity of a building structure. Scuppers play a pivotal role in this process by providing an exit route for rainwater.
In this article, we explore the essentials of installing scuppers on roofs, guiding you through every necessary step.
Table of contents
Introduction to Roof Scuppers
Roof scuppers are essential components in roofing systems designed to efficiently manage rainwater drainage. These are openings or outlets installed through the parapet walls or on the edge of the roof to direct water away from the building structure, preventing water accumulation and potential damage. Roof scuppers work by allowing water to flow off the roof and into downspouts or drainage systems, ensuring proper water disposal.
They come in various shapes and sizes, such as rectangular or circular, and are typically made of durable materials like copper, aluminum, or stainless steel to withstand weather conditions. Proper installation and maintenance of roof scuppers are crucial to ensuring effective water drainage and preventing issues like leaks or water intrusion. Incorporating features like overflow scuppers can provide backup drainage in case of heavy rainfall or clogging in the main scupper system.
5 Key Steps to Installing Scuppers on Roofs
1. Design and Planning
Before installing scuppers on roofs, it is essential to carefully plan and design their placement. Consider factors such as roof slope, rainfall intensity, and building layout to determine the optimal location for the scuppers. Just make sure that the placement allows for efficient water drainage without causing structural issues or water pooling on the roof.
2. Proper Sizing
Choosing the correct size for scuppers is essential for effective water drainage. Calculate the required size based on the roof area, expected rainfall, and drainage capacity. Oversized scuppers can lead to excessive water flow, while undersized scuppers may cause clogging and inefficient drainage. Consult with a roofing professional to determine the appropriate size for your specific roof design.
3. Installation Process
During the installation process, make sure to follow manufacturer guidelines and local building codes. Start by cutting an appropriate opening in the parapet wall or roof edge for the scupper installation. Use waterproof sealant or flashing to secure the scupper in place and prevent water leakage. Properly slope the scupper outlet to ensure smooth water flow and reduce the risk of blockages.
4. Connection to Drainage System
After installing the scuppers, connect them to a suitable drainage system to direct water away from the building foundation. Just make sure that the downspouts or pipes have adequate capacity to handle the expected water volume during heavy rainfall. Regularly inspect and clean the drainage system to prevent clogs and maintain optimal water flow from the scuppers.
5. Testing and Maintenance
Once the scuppers are installed, perform a thorough water test to check for any leaks or drainage issues. Monitor the system during rainfall to get the right functionality and make adjustments if necessary. Establish a routine maintenance schedule to inspect and clean the scuppers, downspouts, and drainage system to prevent blockages and prolong the lifespan of the roofing components. Regular maintenance will help ensure efficient water drainage and protect the building from potential water damage.
Assessing Your Roof for Scupper Installation
- Evaluate Roof Slope: Begin by assessing the slope of your roof to determine if it is suitable for scupper installation. Ideally, roofs with a slight pitch are more conducive to efficient water drainage through scuppers. Steeper roofs may require additional considerations to get the right water flow towards the scupper outlets. For example, a flat roof may need structural modifications to create an adequate slope for effective drainage.
- Inspect Roof Material: Consider the type of roofing material in place before installing scuppers. Different materials, such as shingles, metal panels, or membrane roofing, may require specific installation techniques to accommodate scupper placement. Just make sure that the roofing material can support the weight and installation of scuppers without compromising its integrity. For instance, installing scuppers on a metal roof may involve using specialized flashing and sealants for a watertight connection.
- Assess Water Flow Patterns: Analyze how water currently flows on your roof during rainfall to identify potential areas for scupper installation. Observe any pooling or standing water issues that could indicate inadequate drainage. Installing scuppers in these problematic areas can help redirect water away from the roof and prevent water damage. For example, placing scuppers near valleys or low points on the roof can improve overall drainage efficiency.
- Check Building Codes and Permits: Before proceeding with scupper installation, research local building codes and regulations regarding drainage systems and roof modifications. Obtain any necessary permits required for altering the roof structure to install scuppers. Compliance with building codes makes sure that the installation meets safety standards and legal requirements. For instance, some jurisdictions may have specific guidelines on the size and placement of scuppers based on the building’s location and climate.
- Consult with a Professional: Consider seeking guidance from a roofing professional or contractor experienced in scupper installations. A professional assessment can provide valuable insights into the feasibility and best practices for installing scuppers on your specific roof type. They can offer recommendations on scupper placement, sizing, and integration with the existing drainage system. Working with a professional makes sure that the installation is done correctly and efficiently, reducing the risk of potential issues in the future.
The Right Tools and Materials for Installing Scuppers
- Scupper Outlet: The primary tool needed for installing scuppers is a scupper outlet, which serves as the endpoint for water drainage from the roof. Scupper outlets come in various shapes and sizes to accommodate different roof designs and water flow requirements. Just make sure that the scupper outlet is made of durable material like stainless steel or copper to withstand weather exposure and provide long-term performance.
- Cutting Tools: Utilize appropriate cutting tools, such as a reciprocating saw or tin snips, to create openings in the parapet walls or roof edge for scupper installation. Precision cutting is essential to maintaining a proper fit for the scupper and the structural integrity of the roof. Try using specialized blades for cutting through different roofing materials effectively.
- Waterproof Sealant: Use high-quality waterproof sealant or roofing caulk to secure the scupper in place and create a watertight seal around the installation area. Proper sealing prevents water leakage and makes sure that the scupper functions efficiently in directing water away from the building. Look for sealants specifically designed for outdoor use and capable of withstanding UV exposure and temperature fluctuations.
- Flashing Materials: Incorporate flashing materials like metal or rubber flashing strips to further waterproof the connection between the scupper and the roof surface. Flashing helps prevent water infiltration around the Scupper installation site, reducing the risk of leaks and water damage. Choose flashing materials that are compatible with the roofing material and provide a durable barrier against moisture.
- Fasteners and Anchors: Secure the scupper in place using appropriate fasteners and anchors that can withstand wind uplift and water pressure. Select corrosion-resistant screws or bolts to attach the scupper securely to the roof structure without compromising its stability. Try using expansion anchors for added support in areas prone to high winds or heavy rainfall. Proper fastening ensures the longevity and reliability of the scupper installation.
Step-by-Step Guide: Cutting and Fitting the Scupper
- Measure and Mark the Installation Area: Begin by measuring and marking the precise location on the parapet wall or roof edge where the scupper will be installed. Use a level to maintain accurate markings and proper alignment for the scupper placement. Double-check the measurements to avoid errors that could affect the fitting process.
- Cut an Opening for the Scupper: Using a reciprocating saw or appropriate cutting tool, carefully cut out the marked area to create a clean opening for the scupper. Take caution to follow the outlined measurements and maintain straight cuts to facilitate the fitting of the scupper. Remove any debris or sharp edges from the opening for a smooth installation process.
- Fit the Scupper into the Opening: Insert the scupper into the cut opening, ensuring a snug and secure fit against the parapet wall or roof edge. Check that the scupper aligns correctly with the drainage direction and sits flush with the surface for a proper seal. Make any necessary adjustments to position the scupper accurately before proceeding to secure it in place.
- Apply Waterproof Sealant: Use waterproof sealant or roofing caulk around the edges of the scupper where it meets the wall or roof surface. Apply a generous amount of sealant to create a watertight seal and prevent water leakage around the installation area. Smooth out the sealant to ensure full coverage and proper adhesion to both the scupper and the surface.
- Secure the Scupper with Fasteners: Secure the scupper in place by fastening it to the parapet wall or roof edge using appropriate fasteners. Use corrosion-resistant screws or bolts to secure the scupper firmly in place without over-tightening. Just make sure that the scupper is securely attached to prevent movement or dislodging during inclement weather conditions.
- Install Flashing Around the Scupper: Apply flashing materials around the base of the scupper to further waterproof the connection and protect against water infiltration. Secure the flashing in place with compatible fasteners to create a durable barrier that prevents moisture from seeping into the roof structure. Inspect the flashing for any gaps that may compromise its effectiveness.
- Test for Proper Drainage: Once the scupper is securely installed, conduct a water test to check for proper drainage flow from the scupper. Pour water into the scupper and observe how effectively it drains away from the building structure. Verify that there are no leaks or blockages impeding water flow through the scupper system. Make any necessary adjustments for optimal performance.
- Inspect and Maintain Regularly: After completing the installation process, regularly inspect and maintain the scupper to ensure its continued functionality and prevent issues such as clogging or leaks. Clear any debris or obstructions from the scupper opening and drainage system to maintain efficient water flow. Schedule periodic inspections to identify and address any potential issues immediately.
Sealing and Waterproofing the scum
Sealing and waterproofing the scupper is a critical step to prevent water leakage and ensure the efficiency of the drainage system. Utilizing high-quality waterproof sealant or roofing caulk around the edges of the scupper where it meets the wall or roof surface creates a secure and watertight seal.
Applying flashing materials around the base of the scupper further enhances waterproofing by protecting against moisture infiltration. Proper sealing and waterproofing help maintain the integrity of the scupper installation and safeguard the building structure from water damage.
Regular inspection and maintenance of the sealant and flashing are essential to address any wear or damage that could compromise the effectiveness of the waterproofing barrier over time.
Compatibility of Scuppers with Different Roof Types
- Flat Roofs: Scuppers are commonly used on flat roofs to facilitate proper water drainage. They can be installed along the perimeter of the roof to direct water off the roof surface efficiently. Properly placed scuppers help prevent water accumulation and potential structural damage on flat roofs by redirecting water away from the building. For example, a commercial building with a flat roof may benefit from strategically placed scuppers to prevent water pooling during heavy rainfall.
- Pitched Roofs: While less common on pitched roofs, scuppers can still be integrated to enhance drainage systems. Scuppers installed on pitched roofs are typically positioned at the lower edges to allow water to flow off the roof. They complement traditional gutters and downspouts by providing additional drainage points. Incorporating scuppers on a pitched roof can help prevent water backup in valleys or eaves, improving overall water management. For instance, a residential home with a steeply pitched roof may incorporate scuppers near dormers or valleys to enhance drainage efficiency.
- Metal Roofs: Scuppers can be compatible with various types of metal roofing materials, such as standing seam metal roofs or corrugated metal panels. Specialized flashing and sealants are used to create a watertight connection between the scupper and the metal roof surface. Proper installation of scuppers on metal roofs ensures effective water drainage without compromising the roof’s integrity. For example, a warehouse with a standing seam metal roof may install scuppers to prevent water infiltration and maintain the durability of the roofing system.
- Membrane Roofs: Scuppers are suitable for membrane roofing systems like EPDM or TPO roofs, providing an effective solution for water drainage. The scupper installation process on membrane roofs involves ensuring compatibility with the roofing material and using appropriate flashing details to prevent leaks. Scuppers integrated into membrane roofs help manage water runoff and protect the roof structure from water damage. For instance, a commercial building with a flat EPDM membrane roof may incorporate scuppers to maintain proper drainage and extend the lifespan of the roofing system.
- Tile or Shingle Roofs: While less common, scuppers can be adapted for use with tile or shingle roofing systems. Careful consideration is needed to get the right integration of scuppers without compromising the aesthetics or functionality of the roof. Custom flashing and sealant applications are essential to maintain waterproofing and prevent leaks around the scupper installation area. Incorporating scuppers on tile or shingle roofs can provide an alternative drainage solution in areas where traditional gutters may not be practical. For example, a residential home with a clay tile roof may install discreet scuppers to address localized drainage challenges without detracting from the roof’s visual appeal.
Maintenance Tips for Roof Scuppers
- Regular Inspection: Conduct routine inspections of the scuppers to check for any signs of damage, blockages, or deterioration. Look for debris, leaves, or other obstructions that may hinder proper water flow. Inspecting the scuppers regularly allows for early detection of issues and timely maintenance to prevent potential water damage.
- Clear Debris: Remove any debris or buildup in and around the scuppers to ensure unobstructed water flow. Use a brush or hose to clean out leaves, dirt, or other materials that could clog the scupper openings. Keeping the scuppers clear of debris prevents water backup and maintains efficient drainage from the roof.
- Check Seals and Flashing: Inspect the seals and flashing around the scuppers for any signs of wear, cracking, or gaps. Damaged seals or flashing can lead to water leakage and compromise the waterproofing of the scupper system. Replace or repair any deteriorated seals or flashing to maintain the integrity of the scupper installation.
- Monitor Downspouts and Drainage System: make sure the downspouts connected to the scuppers are clear and free of obstructions. Check the entire drainage system for leaks, blockages, or misalignments that could affect water flow. Properly functioning downspouts are essential for directing water away from the building and preventing water damage.
- Seasonal Maintenance: Perform seasonal maintenance on the scuppers to address specific weather conditions and prevent issues related to changing seasons. For example, before the rainy season, inspect and clean the scuppers for the best drainage during heavy rainfall. In colder climates, prevent ice dams by clearing snow and ice from around the scuppers to maintain proper water flow.
- Professional Inspection: Consider scheduling periodic inspections by a roofing professional to assess the condition of the scuppers and overall drainage system. Roofing experts can identify potential issues early on and provide recommendations for maintenance or repairs. Professional inspections help prolong the lifespan of the scuppers and ensure effective water management on the roof.
Common Issues and Troubleshooting for Roof Scuppers
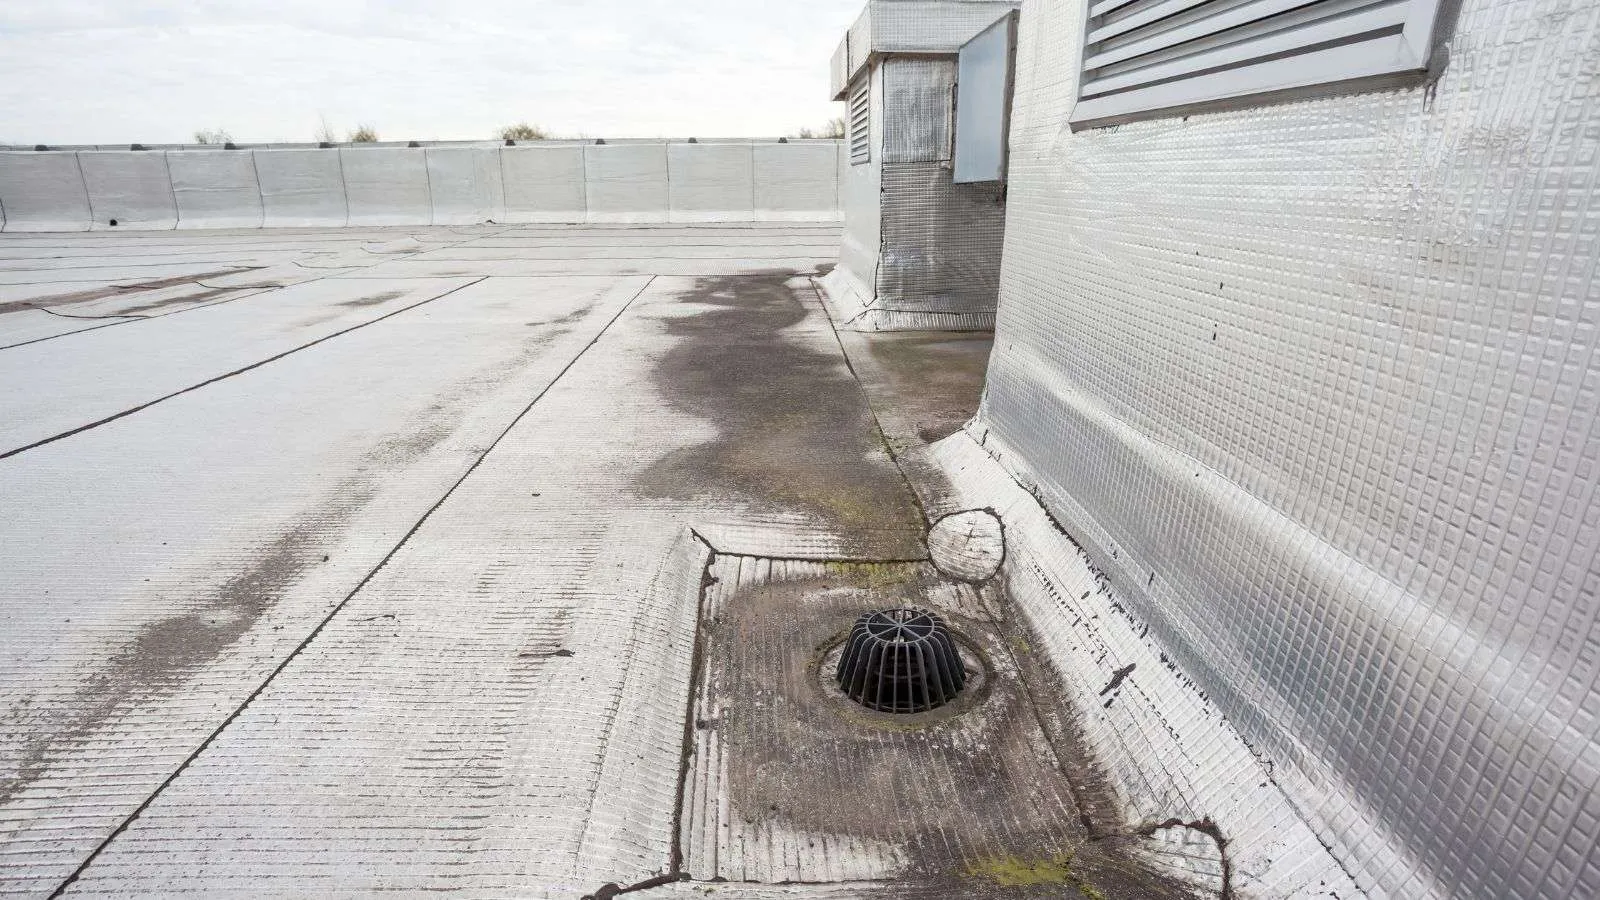
- Clogging: One common issue with roof scuppers is clogging due to debris accumulation, such as leaves, dirt, or branches. Clogs can obstruct water flow and lead to water pooling on the roof, potentially causing leaks or structural damage. Troubleshoot clogging by regularly clearing debris from the scupper openings and ensuring unobstructed drainage pathways to prevent blockages.
- Leakage: Leakage around the scupper area can occur due to damaged seals, deteriorated flashing, or improper installation. Water infiltration through leaks can compromise the waterproofing of the scupper system and result in water damage to the building. Address leakage issues by inspecting and repairing damaged seals, replacing worn flashing, and ensuring a tight seal between the scupper and the roof surface.
- Poor Drainage: Inadequate drainage is another common issue that can arise with roof scuppers, leading to water backup or insufficient water flow off the roof. Inadequate scupper sizing, an improper slope, or drainage system obstructions can all contribute to poor drainage. Troubleshoot poor drainage by verifying the scupper size meets the roof’s water runoff needs, adjusting the slope for efficient water flow, and clearing any obstructions in the drainage pathway.
- Freezing and Ice Dams: In colder climates, freezing temperatures can lead to ice dams forming around roof scuppers, hindering proper water drainage. Ice dams can cause water to back up under roofing materials, leading to leaks and potential damage. Troubleshoot freezing and ice dams by preventing ice buildup around the scuppers through insulation, heat cables, or regular snow removal to maintain clear drainage paths.
- Structural Damage: Over time, inadequate maintenance or unresolved issues with roof scuppers can contribute to structural damage to the building. Water accumulation, leaks, or poor drainage can weaken the roof structure and lead to costly repairs or replacements. Troubleshoot structural damage by addressing underlying scupper issues immediately, conducting regular inspections, and performing necessary repairs to prevent further damage and maintain the integrity of the building.
Enhancing Roof Drainage with Scupper Additions
Enhancing roof drainage with scupper additions involves strategically installing additional scuppers to improve water flow and prevent water accumulation on the roof. The overall effectiveness of the drainage system can be improved by adding more scuppers to places where water tends to pool or where there is not enough drainage.
Supplementing existing scuppers with overflow scuppers can provide backup drainage during heavy rainfall or in cases of blockages, ensuring continuous water evacuation. For example, a large industrial facility with a flat roof may benefit from installing extra scuppers near roof valleys or low points to enhance water drainage and prevent potential water-related issues.
Legal and Building Code Considerations for Scupper Installation
When considering scupper installation, it’s best to adhere to legal and building code requirements to guarantee compliance and safety. Building codes often dictate specific guidelines regarding the size, placement, and construction of scuppers to meet structural and safety standards.
Local regulations may also address aspects such as drainage capacity, overflow measures, and materials used for scupper installations. For instance, certain jurisdictions may require scuppers to be a minimum distance from property lines or have a specified diameter based on the roof area.
Final Thoughts: The Importance of Professional Installation
The professional installation of roof scuppers is paramount to ensuring the effectiveness and longevity of the drainage system. Experienced roofing professionals have the expertise to assess the roof structure, determine the optimal placement of scuppers, and install them according to industry best practices and building codes.
Their knowledge allows for proper sizing, sealing, and integration of scuppers into the existing roofing system to prevent issues such as leaks, inadequate drainage, or structural damage. Professional installers can also identify potential challenges or complexities unique to each roof type and address them effectively during installation.

Author: Logan from Big Home Projects
I help people connect with businesses
